Add User Authentication to Your Application
User Authentication and Management is one of the most important aspects in application development.
With the Cdev API resource, we can add granular User Authorization and Role-Based Access Control (RBAC) to any backend. The Cdev API resource supports
user authentication through JSON Web Tokens(JWT).
JWT Authentication
For these examples, we will be using Auth0 as our User Authorization platform and integrating their service into our API’s. Auth0 provides great tutorials and we based the following examples off their official documentation and a helpful blog by Sandrino Di Mattia.
Set Up
We will be starting this tutorial from the user-auth template.
cdev init user-auth-demo --template user-auth
Create a Basic API
You should have a src/resources.py file that looks like:
    # Generated as part of the user-auth project template
import json

from cdev.aws.api import Api
from cdev.aws.lambda_function import ServerlessFunction

from cdev import Project as cdev_project

myProject = cdev_project.instance()

DemoApi = Api("demoapi")
demo_route = DemoApi.route("/demo", "GET")


@ServerlessFunction("demo_handler", events=[demo_route.event()])
def hello_world(event, context):
    print('Hello from inside your Function!')

    return {
        "status_code": 200,
        "body": json.dumps({"message": "Hello World From The Backend!"}),
        "headers": {
            "content-type": "application/json"
        }
    }


myProject.display_output("Base API URL", DemoApi.output.endpoint)
myProject.display_output("Routes", DemoApi.output.endpoints)
To create the API and Serverless Function run
cdev deploy
Deploy Output
This step should output the live url of your webhook and look like
Base API URL -> https://<your-endpoint>/live
Routes -> FrozenDict({'/demo GET': 'ayhuxeb'})
You can check that this API is working correctly by using the Curl command
curl https://<your_endpoint>/live/demo
Or, by going to the url https://<your_endpoint>/live/demo in your browser.
Setting up Auth0
Auth0 is a cloud-based identity management service that uses APIs and data syncing to provide authentication and authorization services for applications.
You can create a trial Auth0 account that has a free tier of 7,000 active users and unlimited logins with no required credit card.
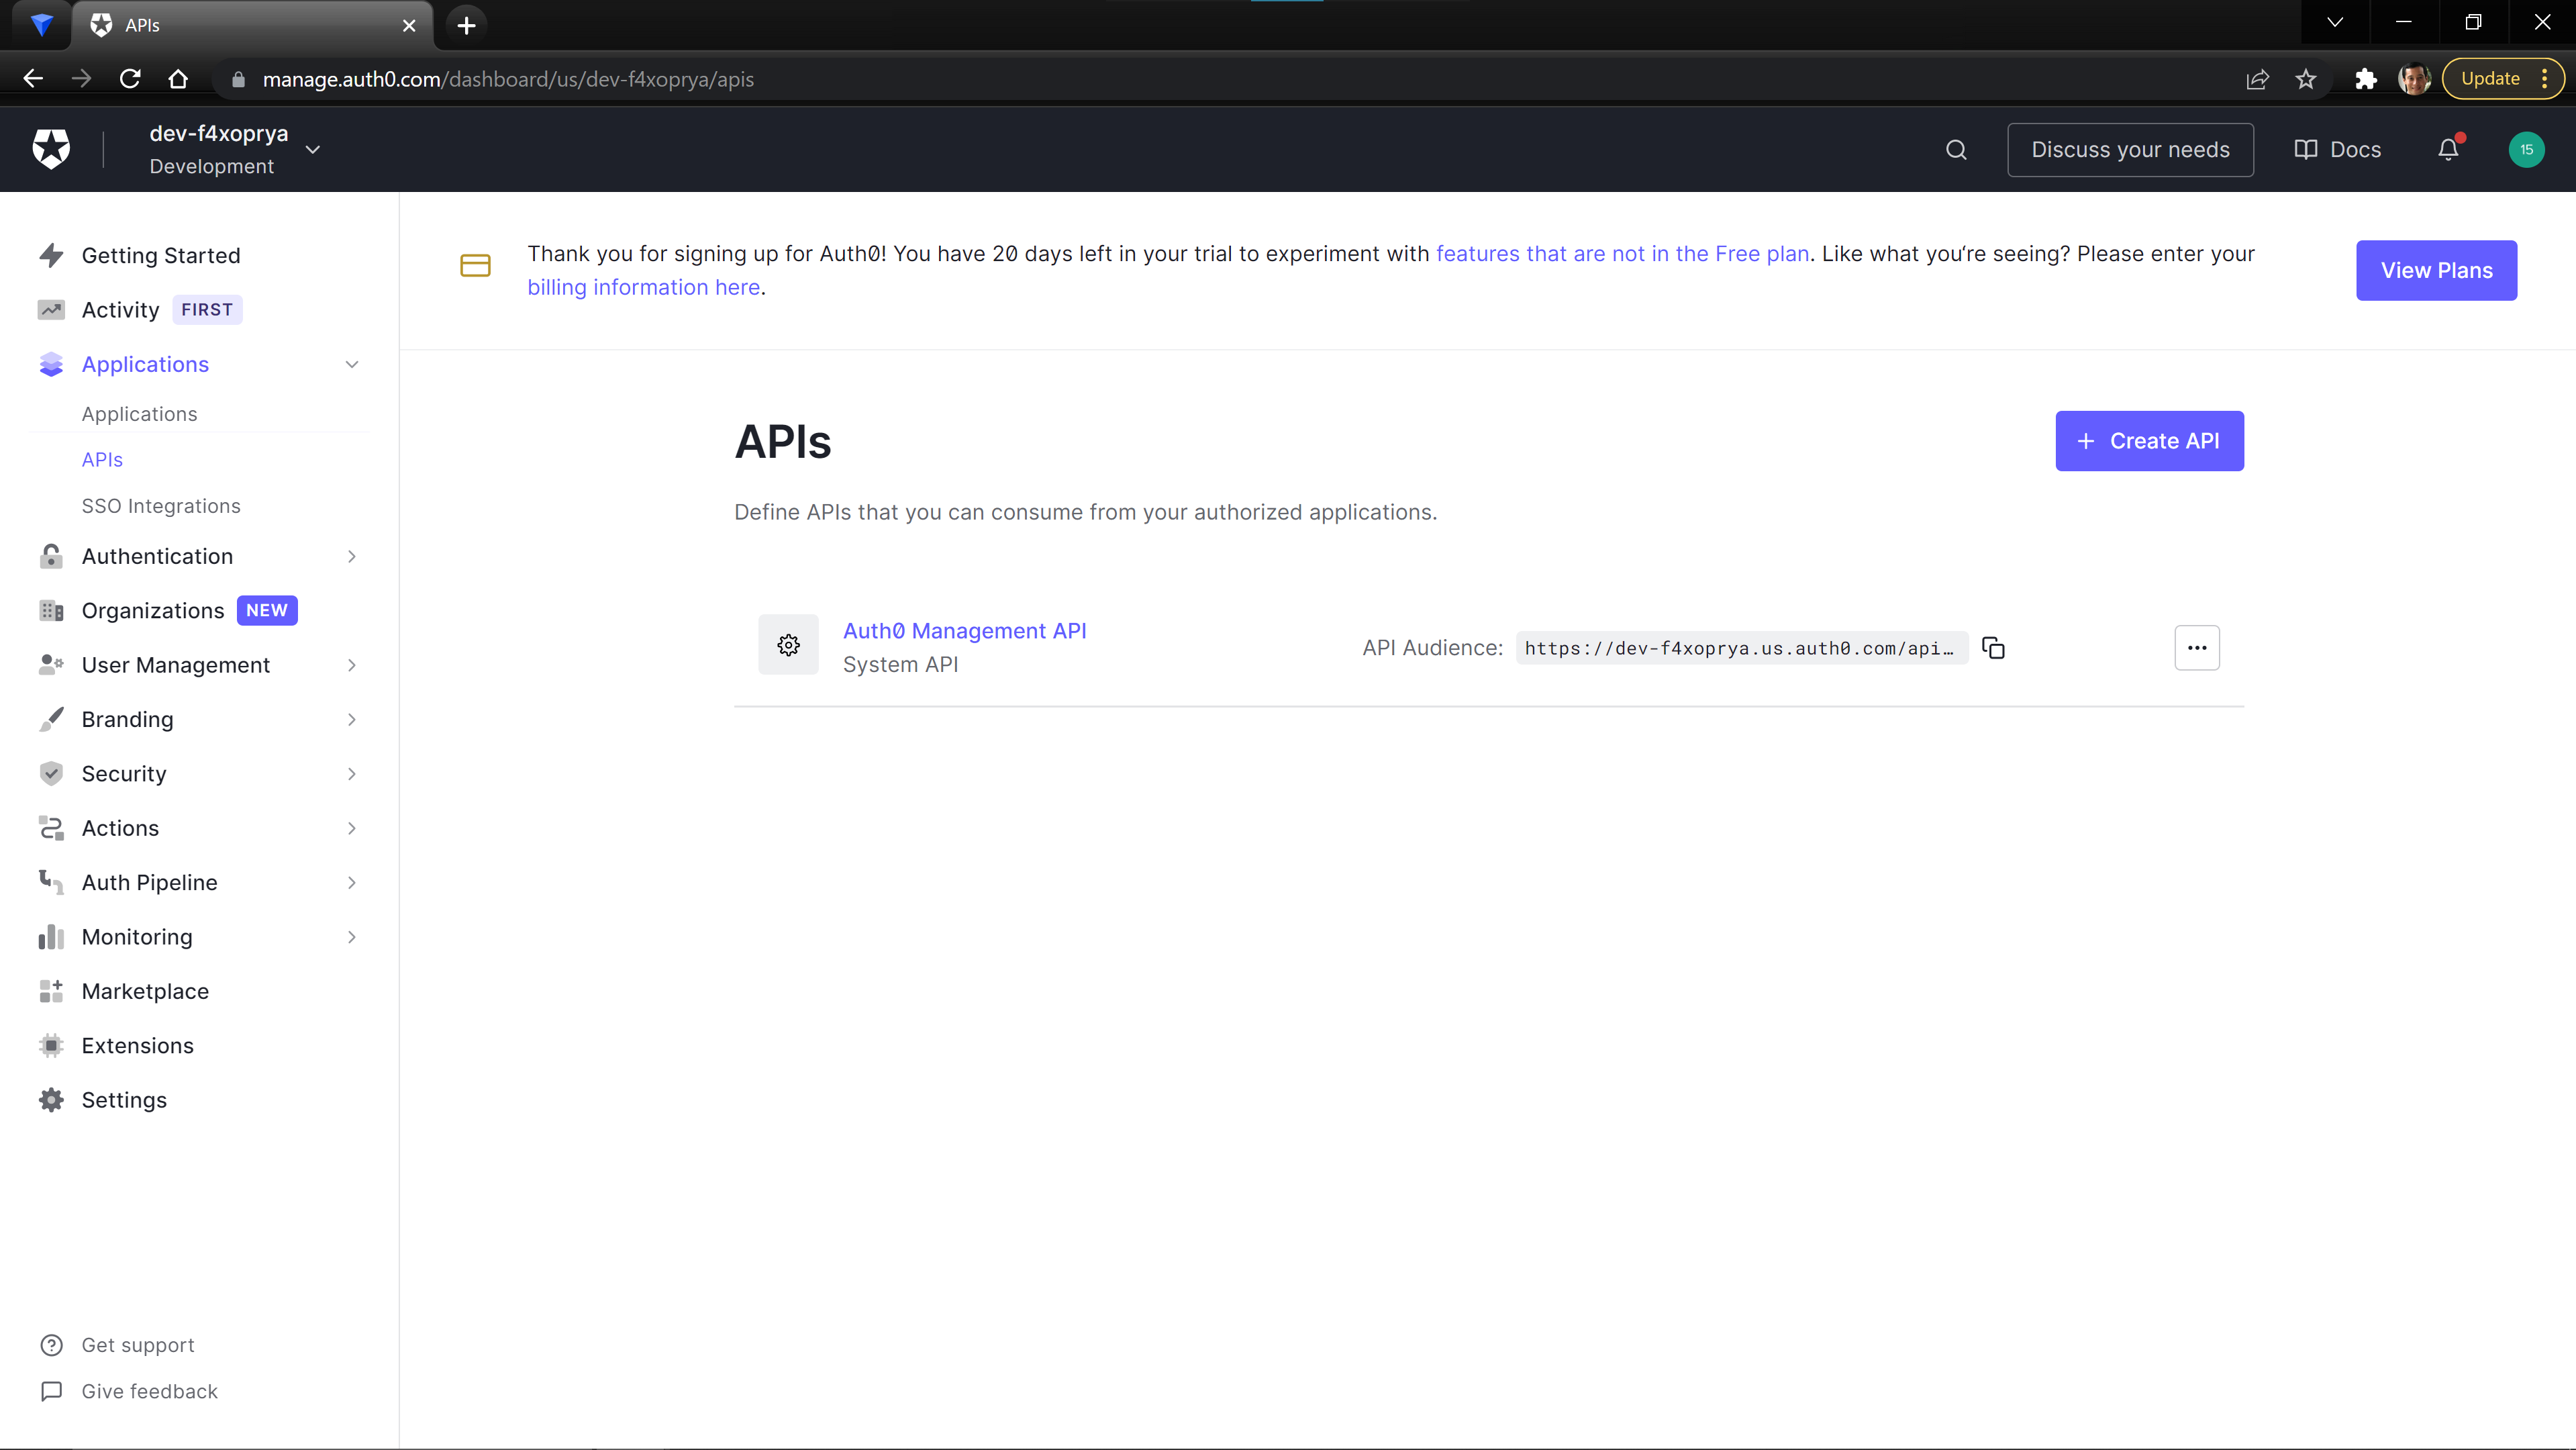
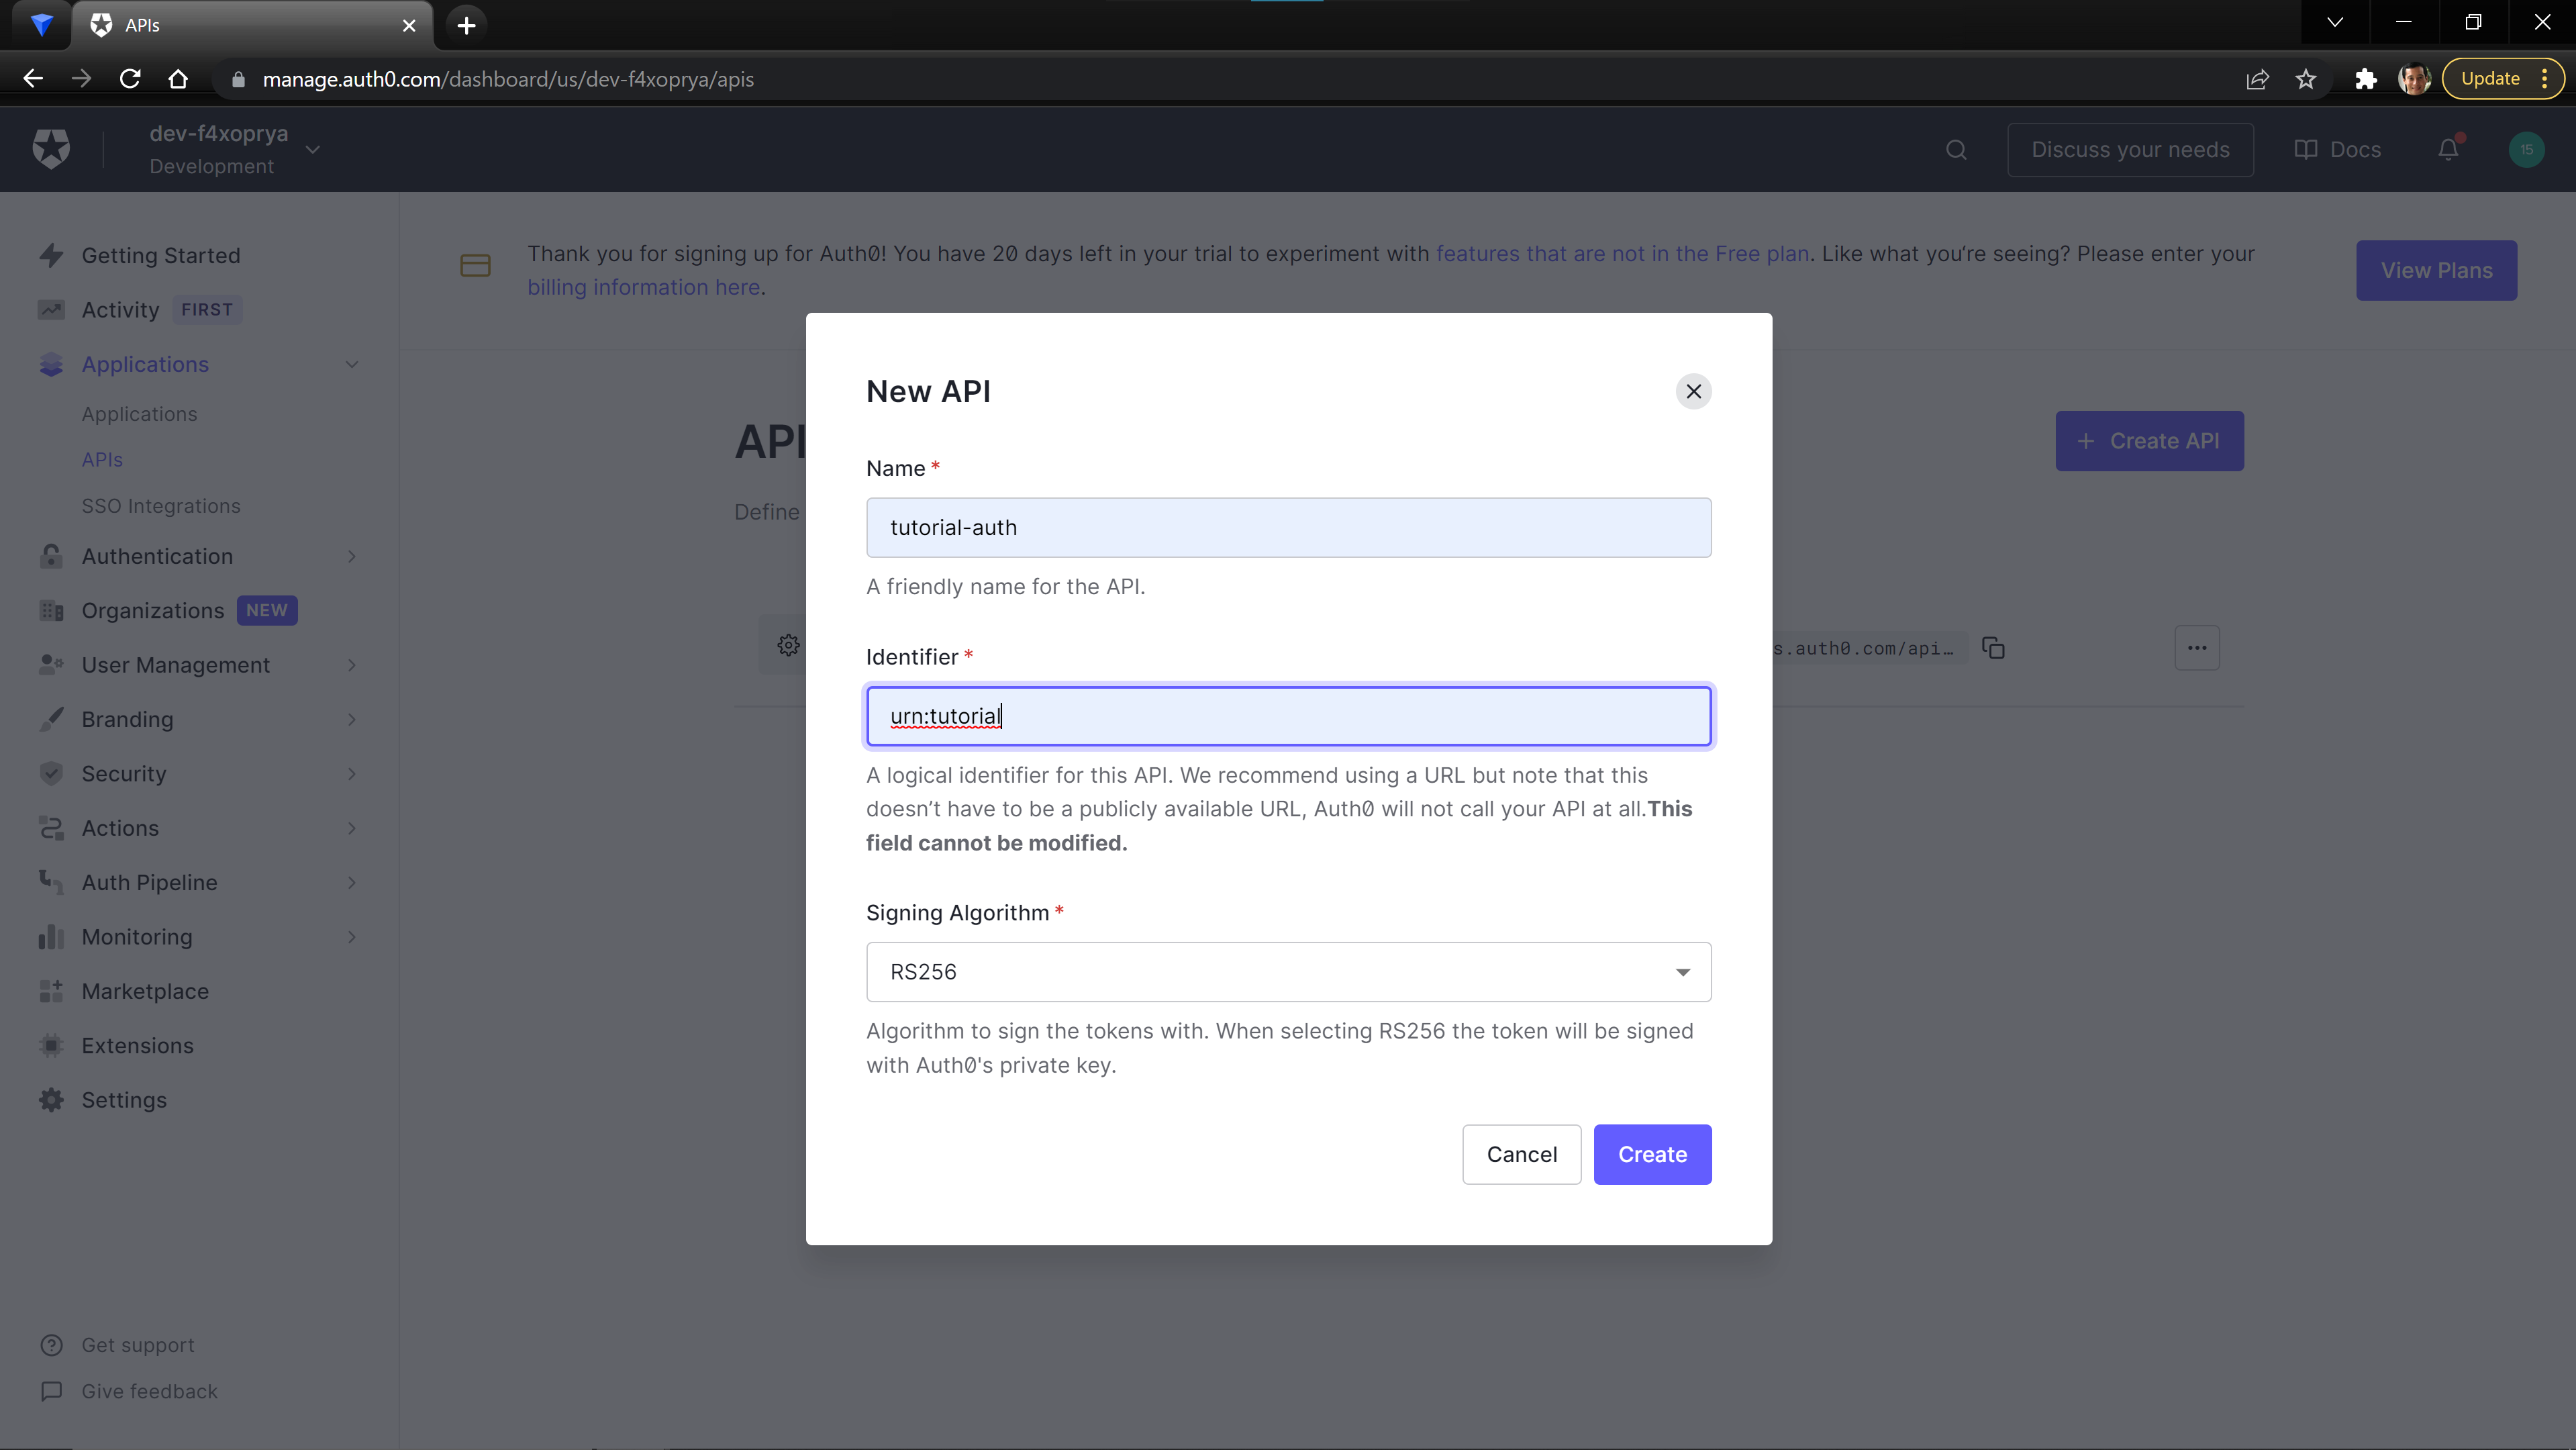
From the Auth0 Dashboard, Create a new API on the Application > API page.
Setting the values
name to whatever makes sense for your project. The value that you provide for the identifier field will need to be saved as it will be used as the audience property in the next step.
We need one more value from Auth0: the issuer_url for your Auth0 account.
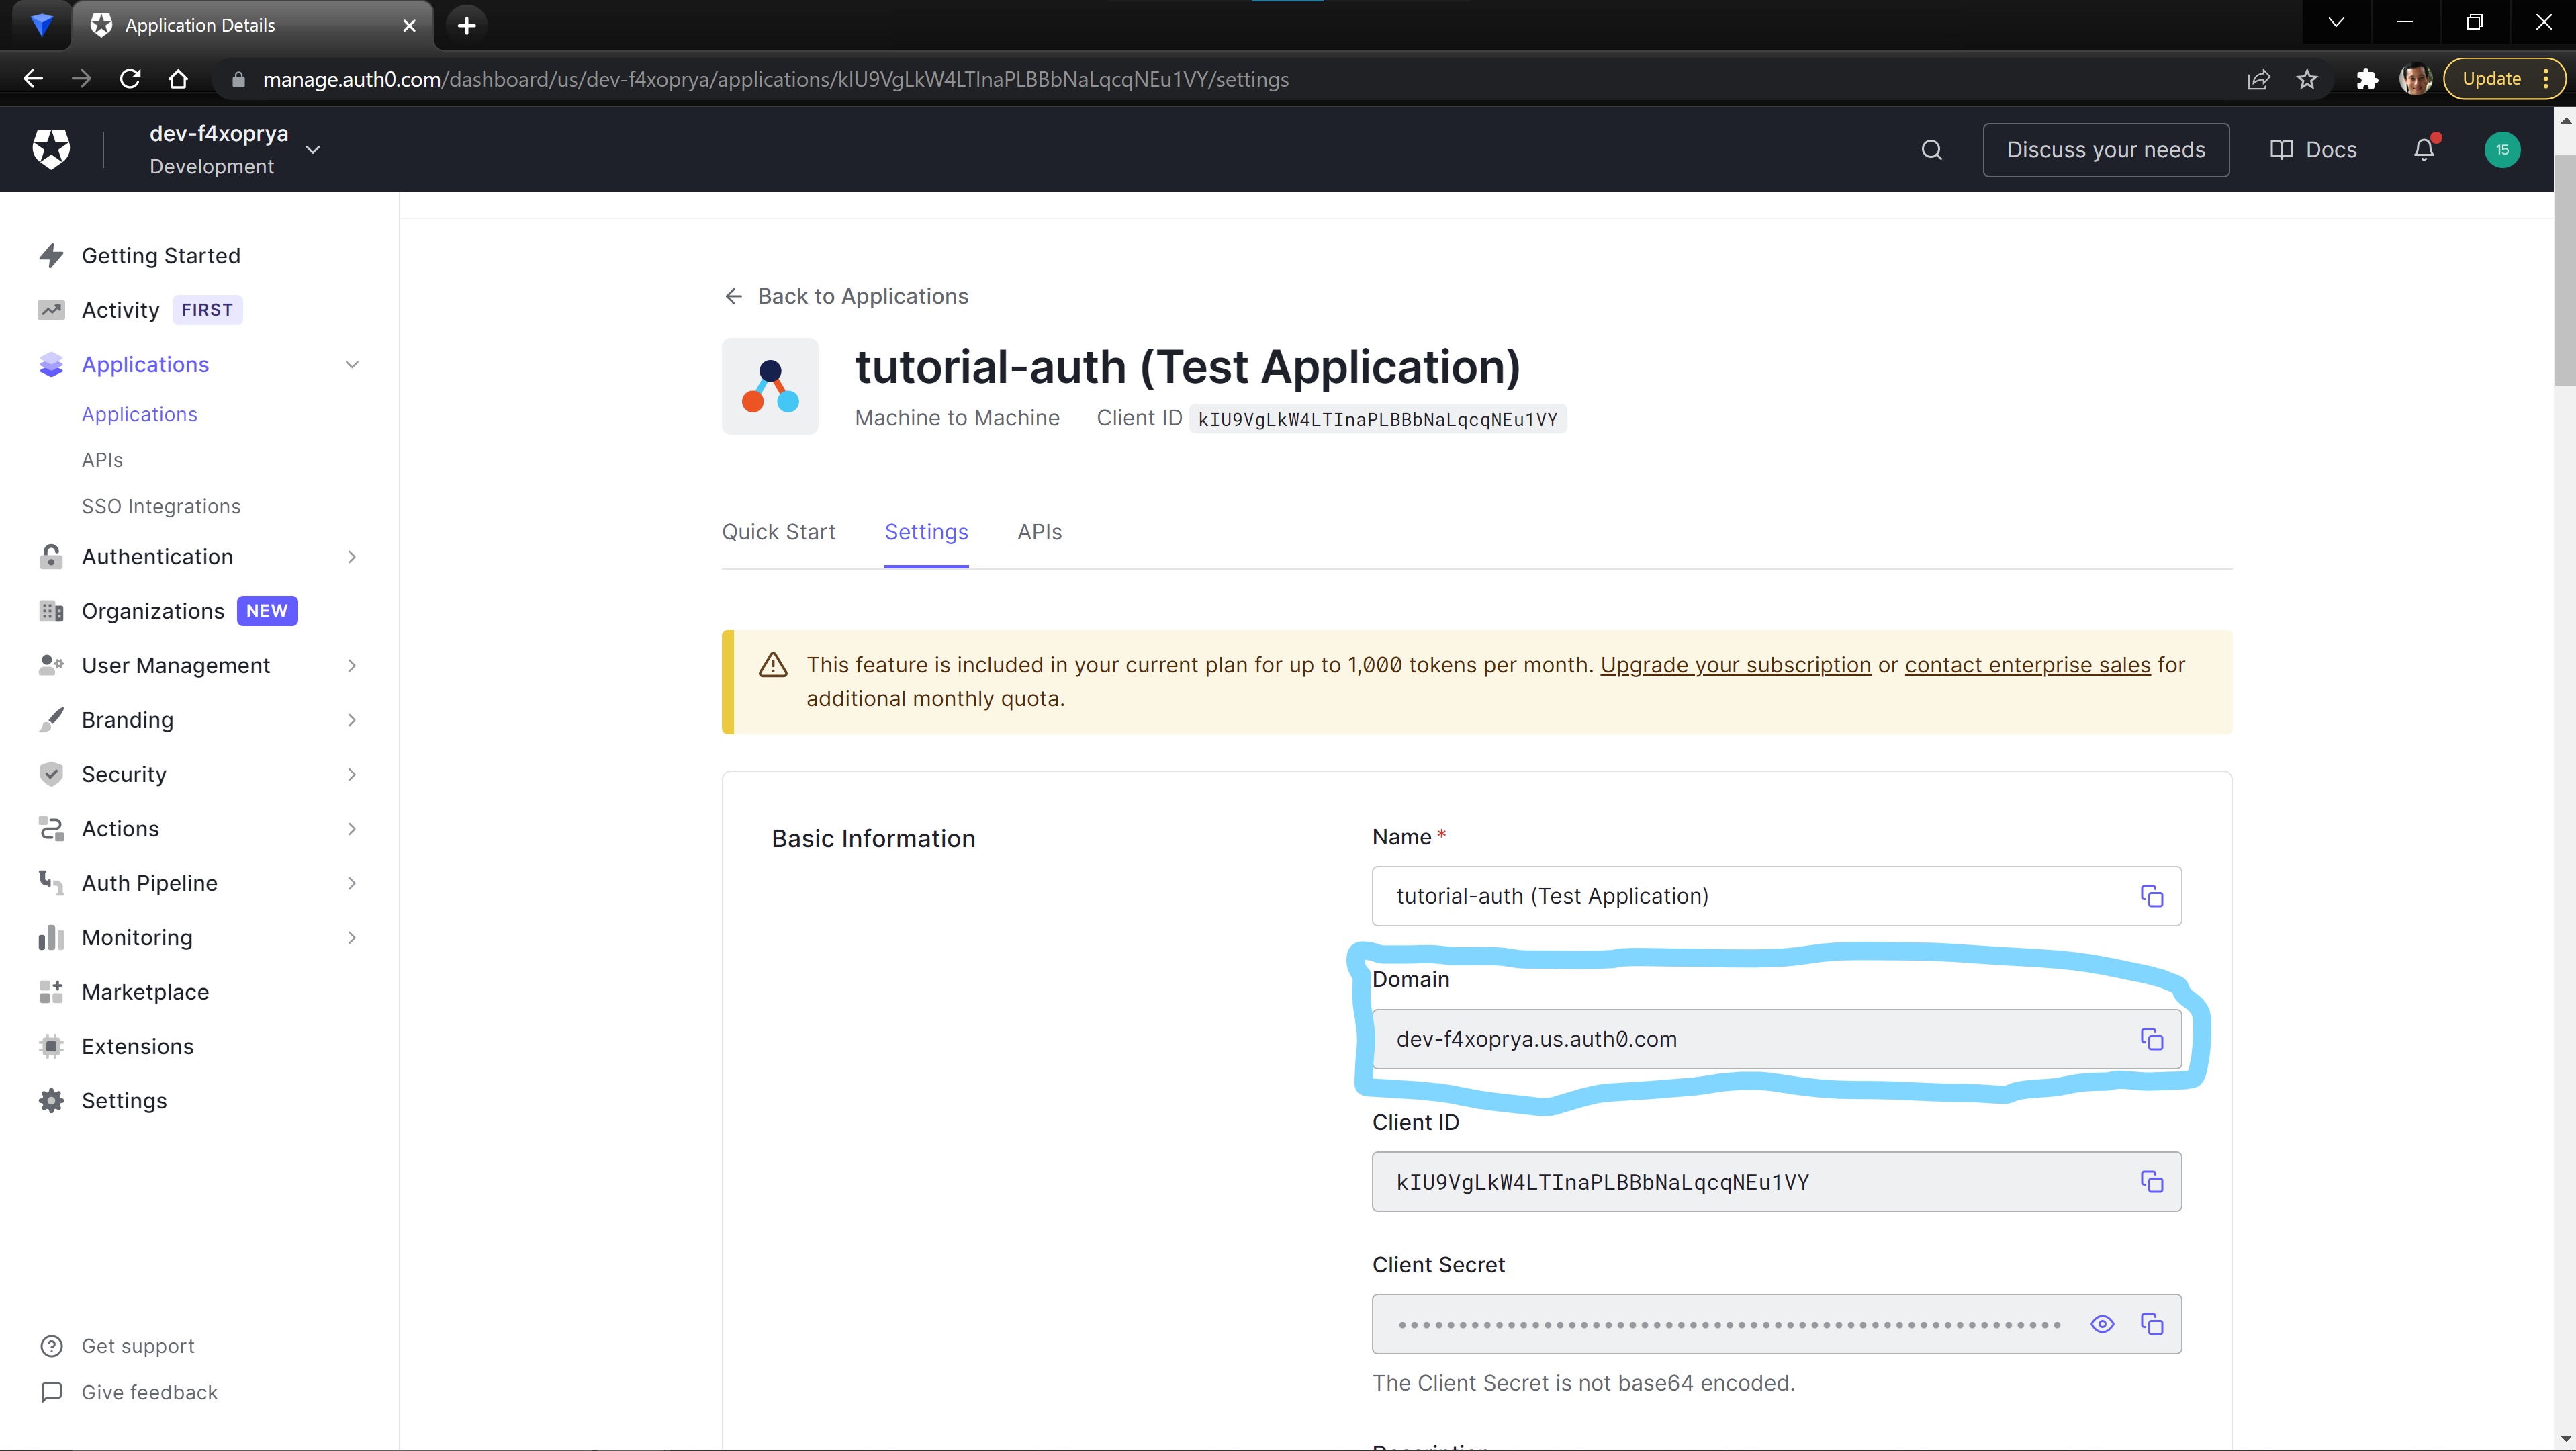
In the Application tab, there should be an auto generated Application for your API. When you open the auto generate app, you will see the Domain for your account. This Domain value will be the issuer_url.
Creating our Authorizer
We can now create an Authorizer for our Cdev API. The Authorizer provides the information needed to configure a JWT authorizer that adds access control to your API endpoint.
Update your /src/resources.py file to the follow, replacing the values on lines 13 and 14.
Setting the issuer_url
issuer_url.
    # Generated as part of user-auth project template
import json

from cdev.aws.api import Api, Authorizer
from cdev.aws.lambda_function import ServerlessFunction

from cdev import Project as cdev_project

myProject = cdev_project.instance()

demoAuthorizer = Authorizer(
    name="defaultAuth",
    issuer_url="<your-issuer-url>", # ex: https://dev-f4xoprya.us.auth0.com/
    audience="<your-audience-id>" # ex: urn:tutorial
)

DemoApi = Api("demoapi", authorizers=[demoAuthorizer], default_authorizer='defaultAuth')
demo_route = DemoApi.route("/demo", "GET")


@ServerlessFunction("demo_handler", events=[demo_route.event()])
def hello_world(event, context):
    print('Hello from inside your Function!')


    return {
        "status_code": 200,
        "body": json.dumps({"message": "Hello World From The Backend!"}),
        "headers": {
            "content-type": "application/json"
        }
    }


myProject.display_output("Base API URL", DemoApi.output.endpoint)
myProject.display_output("Routes", DemoApi.output.endpoints)
Deploy the changes to the src/resources.py file.
cdev deploy
Testing our Authorizer
By setting the default_authorizer property on the API, all created routes will by default use that Authorizer. Now, when we curl the following generated url, we will receive a 401 Authentication Error.
curl -i https://<your_endpoint>/live/demo
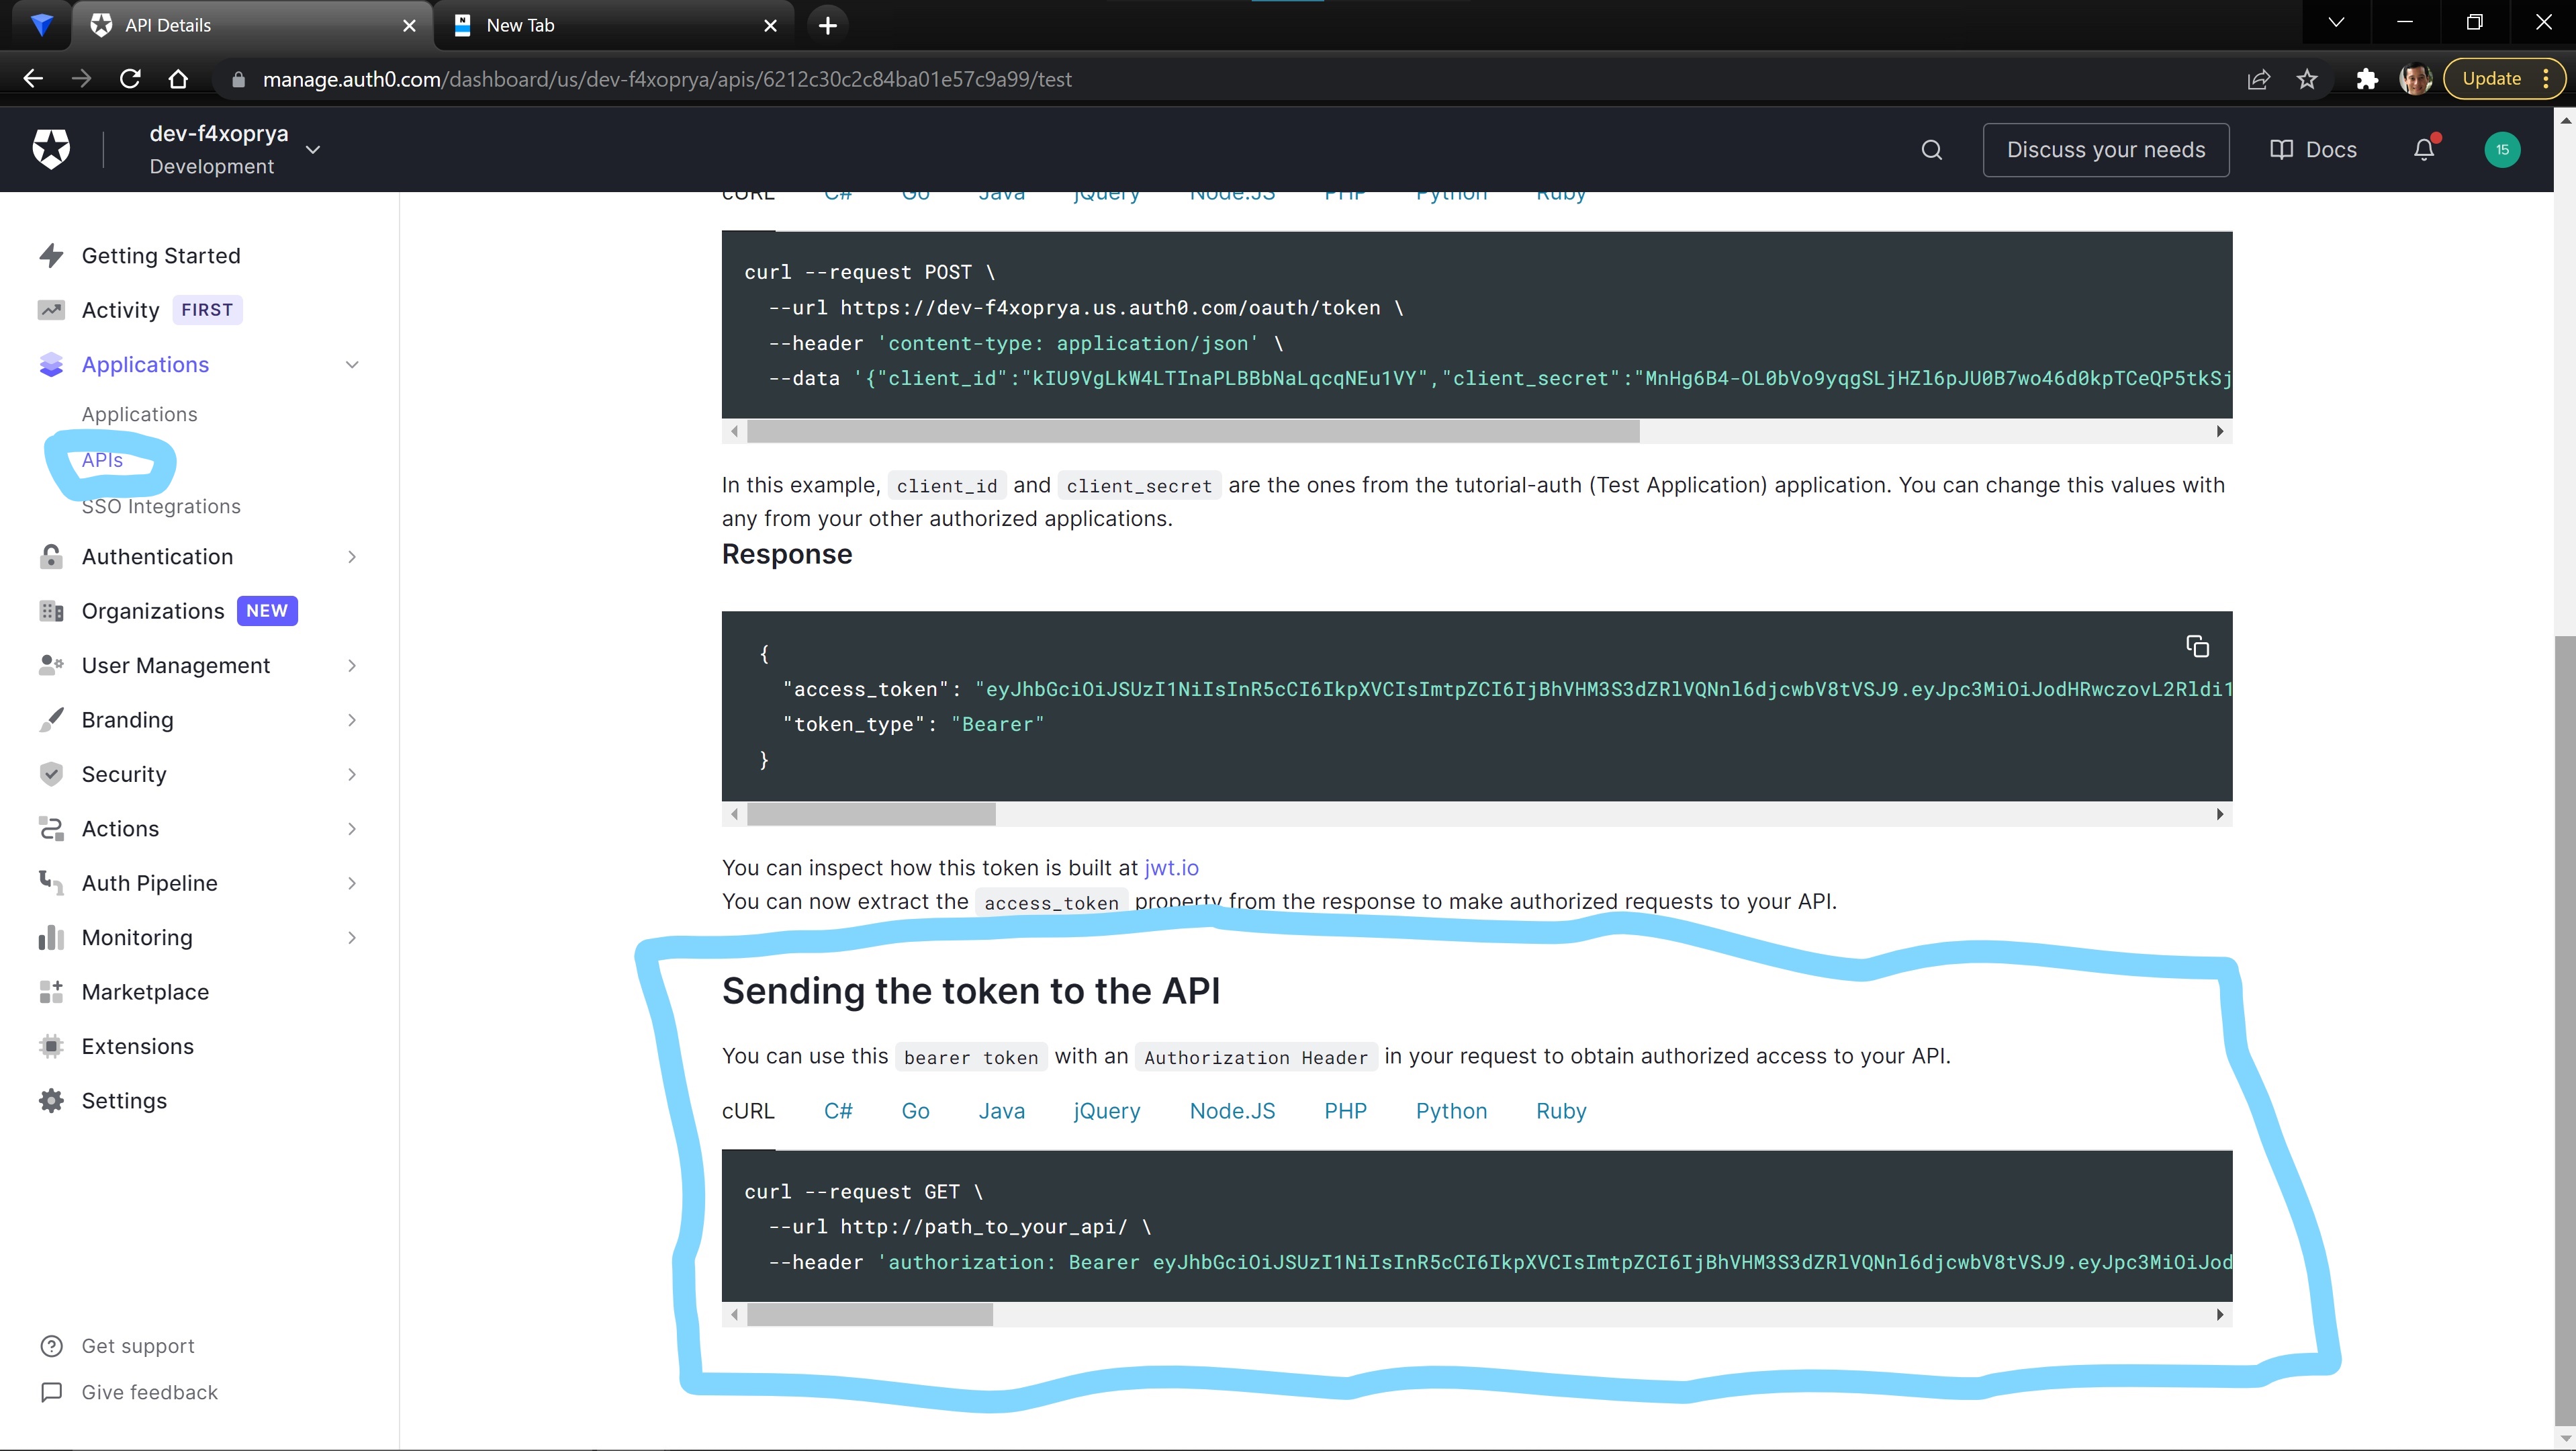
Now, we must have the correct authorization to be able to access this endpoint. In the You can use your preferred You can find more information about Test tab on the API page, Auth0 provides a testing token that can be used to test that the authorization is working correctly.
Test Your Authenticated API
API Development and Testing Tool to test your API or, download and use one of the following:API Development and Testing Tools, in a collection of resources for building and maintaining RESTful APIs maintained by Yos Raidy.
Adding a Frontend to Your Application
We are now going to add a simple HTML page that demonstrates the general concepts of how to create a User Sign-up and Sign-in flow for your application.
Add Static Site Resource
Update lines 7, 37, and 41 to add a Static Site resource to our demo frontend content.
    # Generated as part of user-auth project template
import json

from cdev.aws.api import Api, Authorizer
from cdev.aws.lambda_function import ServerlessFunction

from cdev.aws.frontend import Site

from cdev import Project as cdev_project

myProject = cdev_project.instance()

demoAuthorizer = Authorizer(
    name="defaultAuth",
    issuer_url="<your-issuer-url>", # ex: https://dev-f4xoprya.us.auth0.com/
    audience="<your-audience-id>" # ex: urn:tutorial
)

DemoApi = Api("demoapi", authorizers=[demoAuthorizer], default_authorizer='defaultAuth')
demo_route = DemoApi.route("/demo", "GET")


@ServerlessFunction("demo_handler", events=[demo_route.event()])
def hello_world(event, context):
    print('Hello from inside your Function!')


    return {
        "status_code": 200,
        "body": json.dumps({"message": "Hello World From The Backend!"}),
        "headers": {
            "content-type": "application/json"
        }
    }


myFrontend = Site("demofrontend", content_folder="src/content")

myProject.display_output("Base API URL", DemoApi.output.endpoint)
myProject.display_output("Routes", DemoApi.output.endpoints)
myProject.display_output("Static Site URl", myFrontend.output.site_url)
cdev deploy
Resource Creation Time
HTTPS. Therefore, the Static Site resources creates your frontend on AWS Cloudfront, which is a globally distributed Content Delivery Network (CDN). Using AWS Cloudfront provides many benefits, but it also means that it takes a few minutes to initially create the resource. Once created, updates to the website are instant. As the resource deploys, you can continue with creating the next section on Auth0 or grab a cup of coffee.Create an Application and Database in Auth0
Although we have created and secured our API, we need to add a few more resources to Auth0 to create a user login and authentication work flow.
In the Auth0 console, navigate to the authentication > databases tab. Create a new database that will be used to store the credentials of our development users.
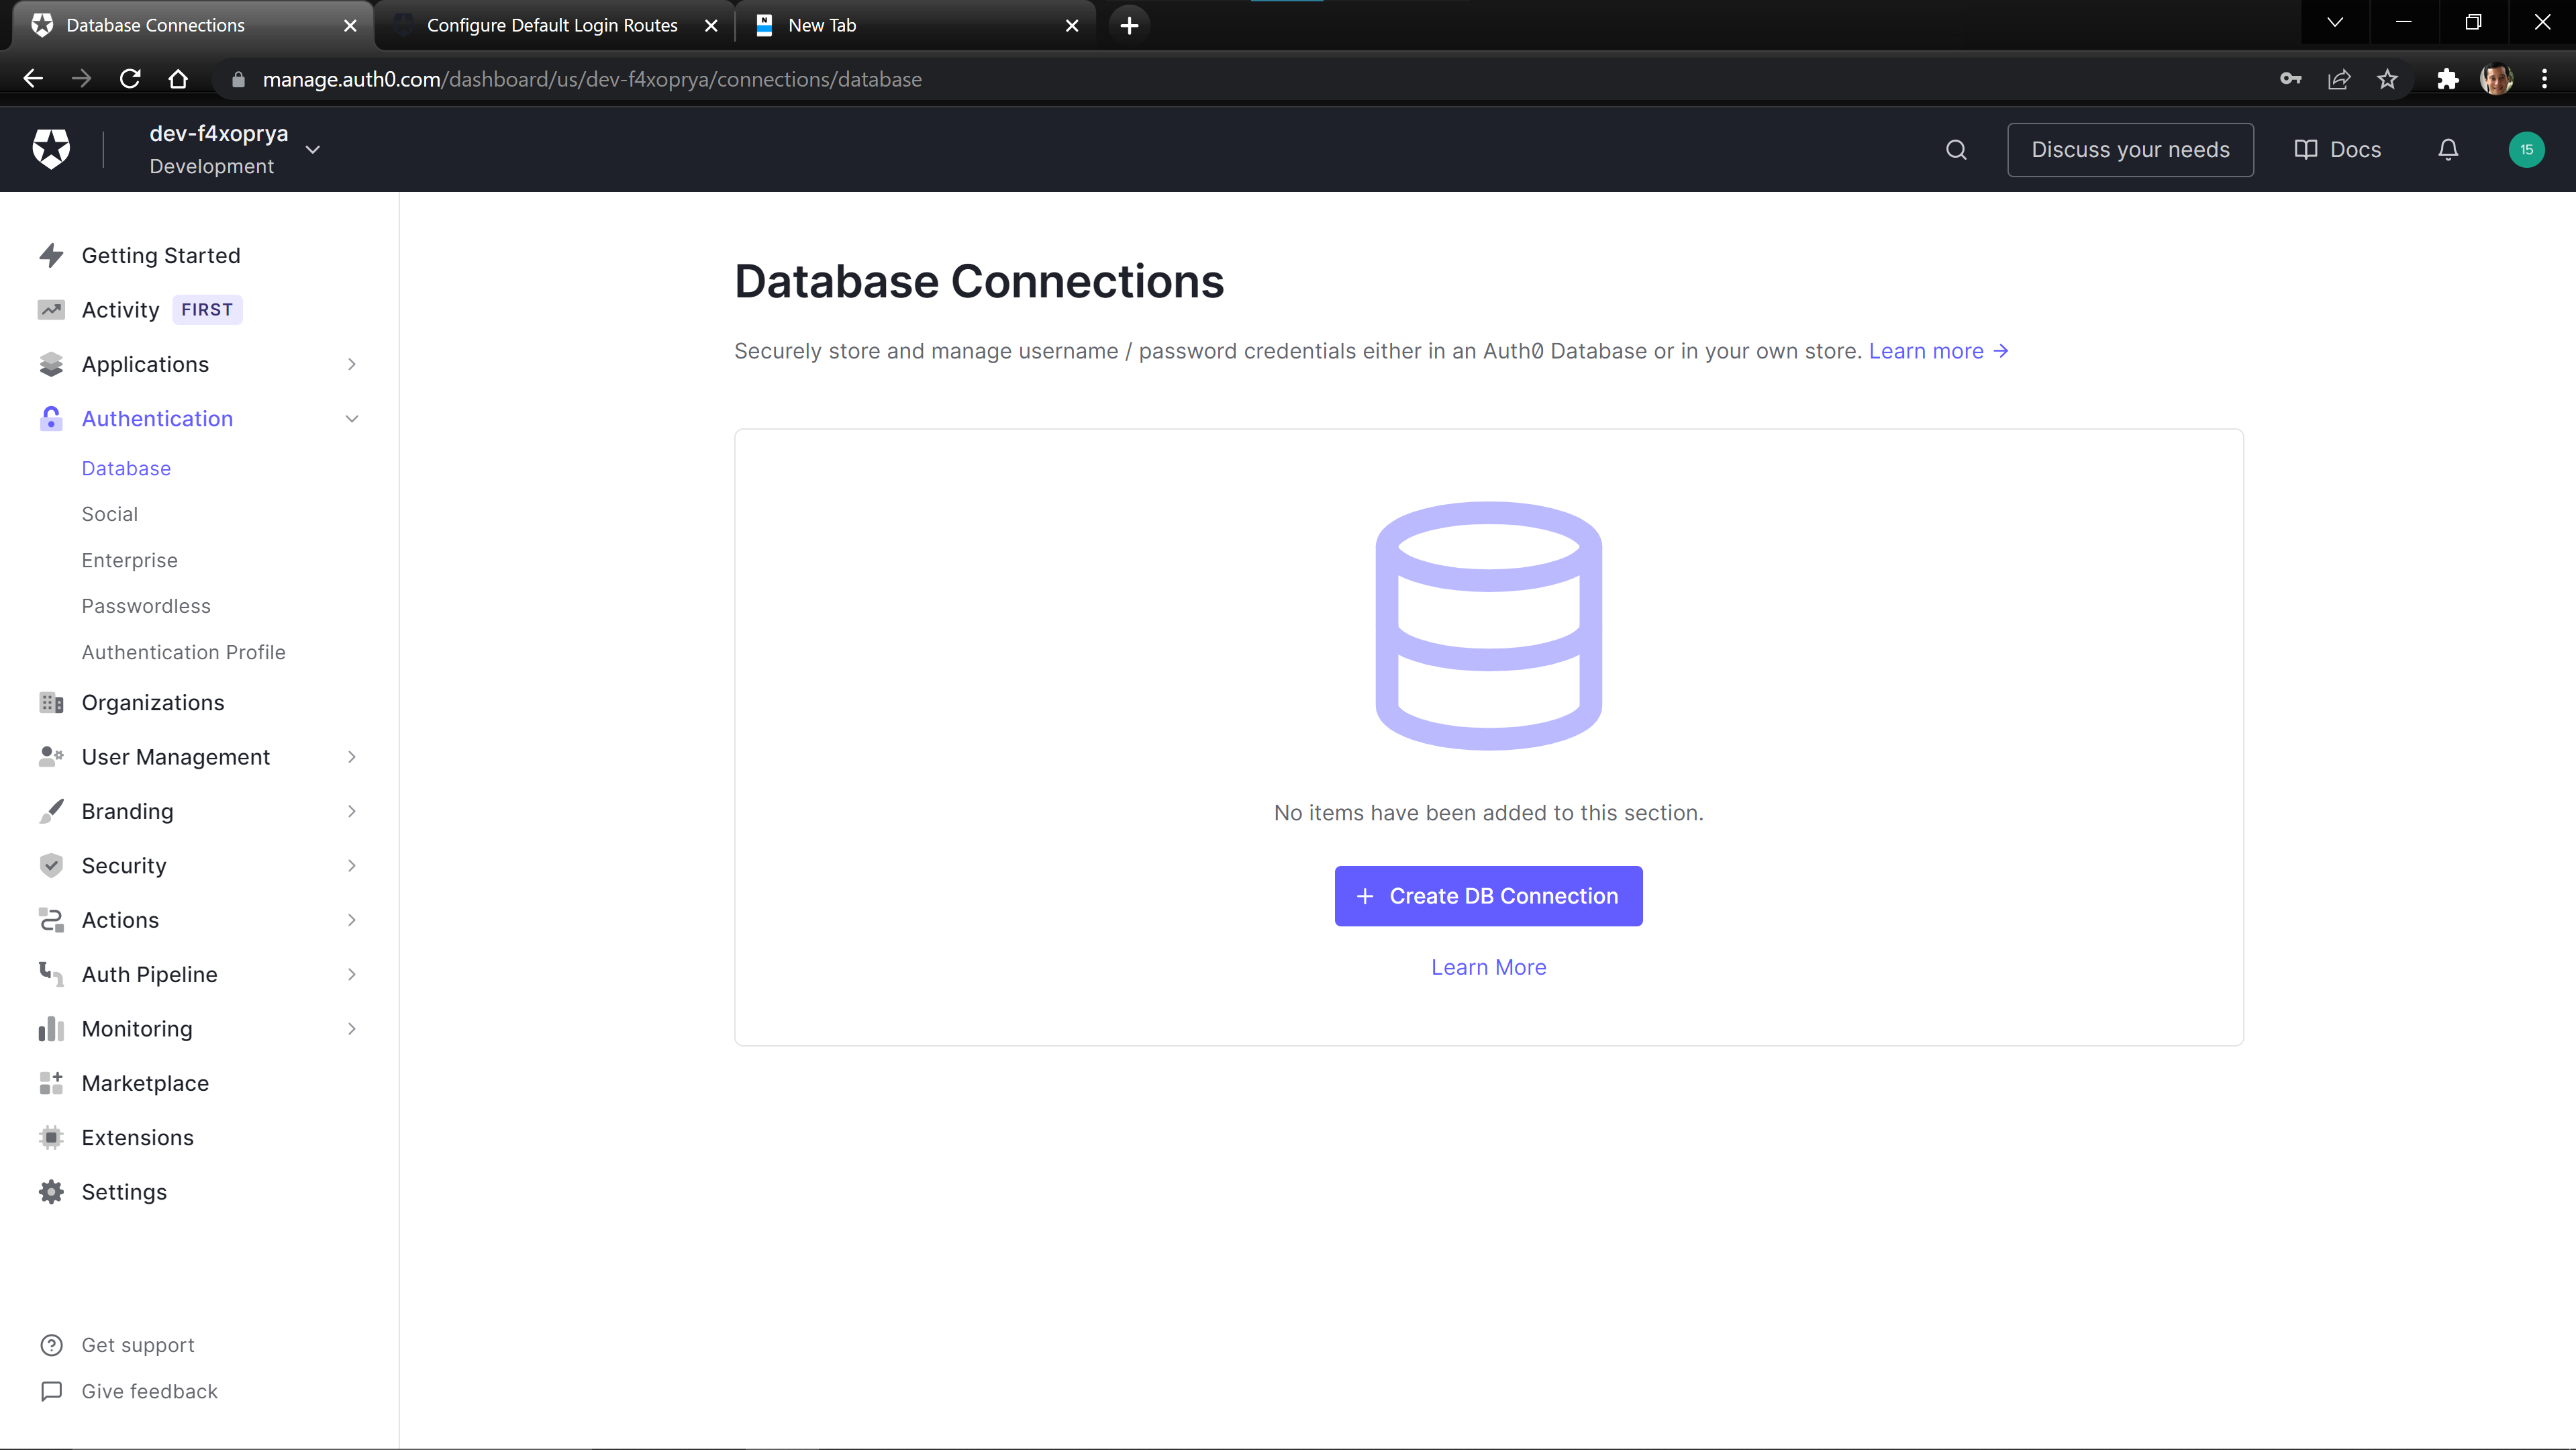
Set the database name to dev-users or any name you prefer.

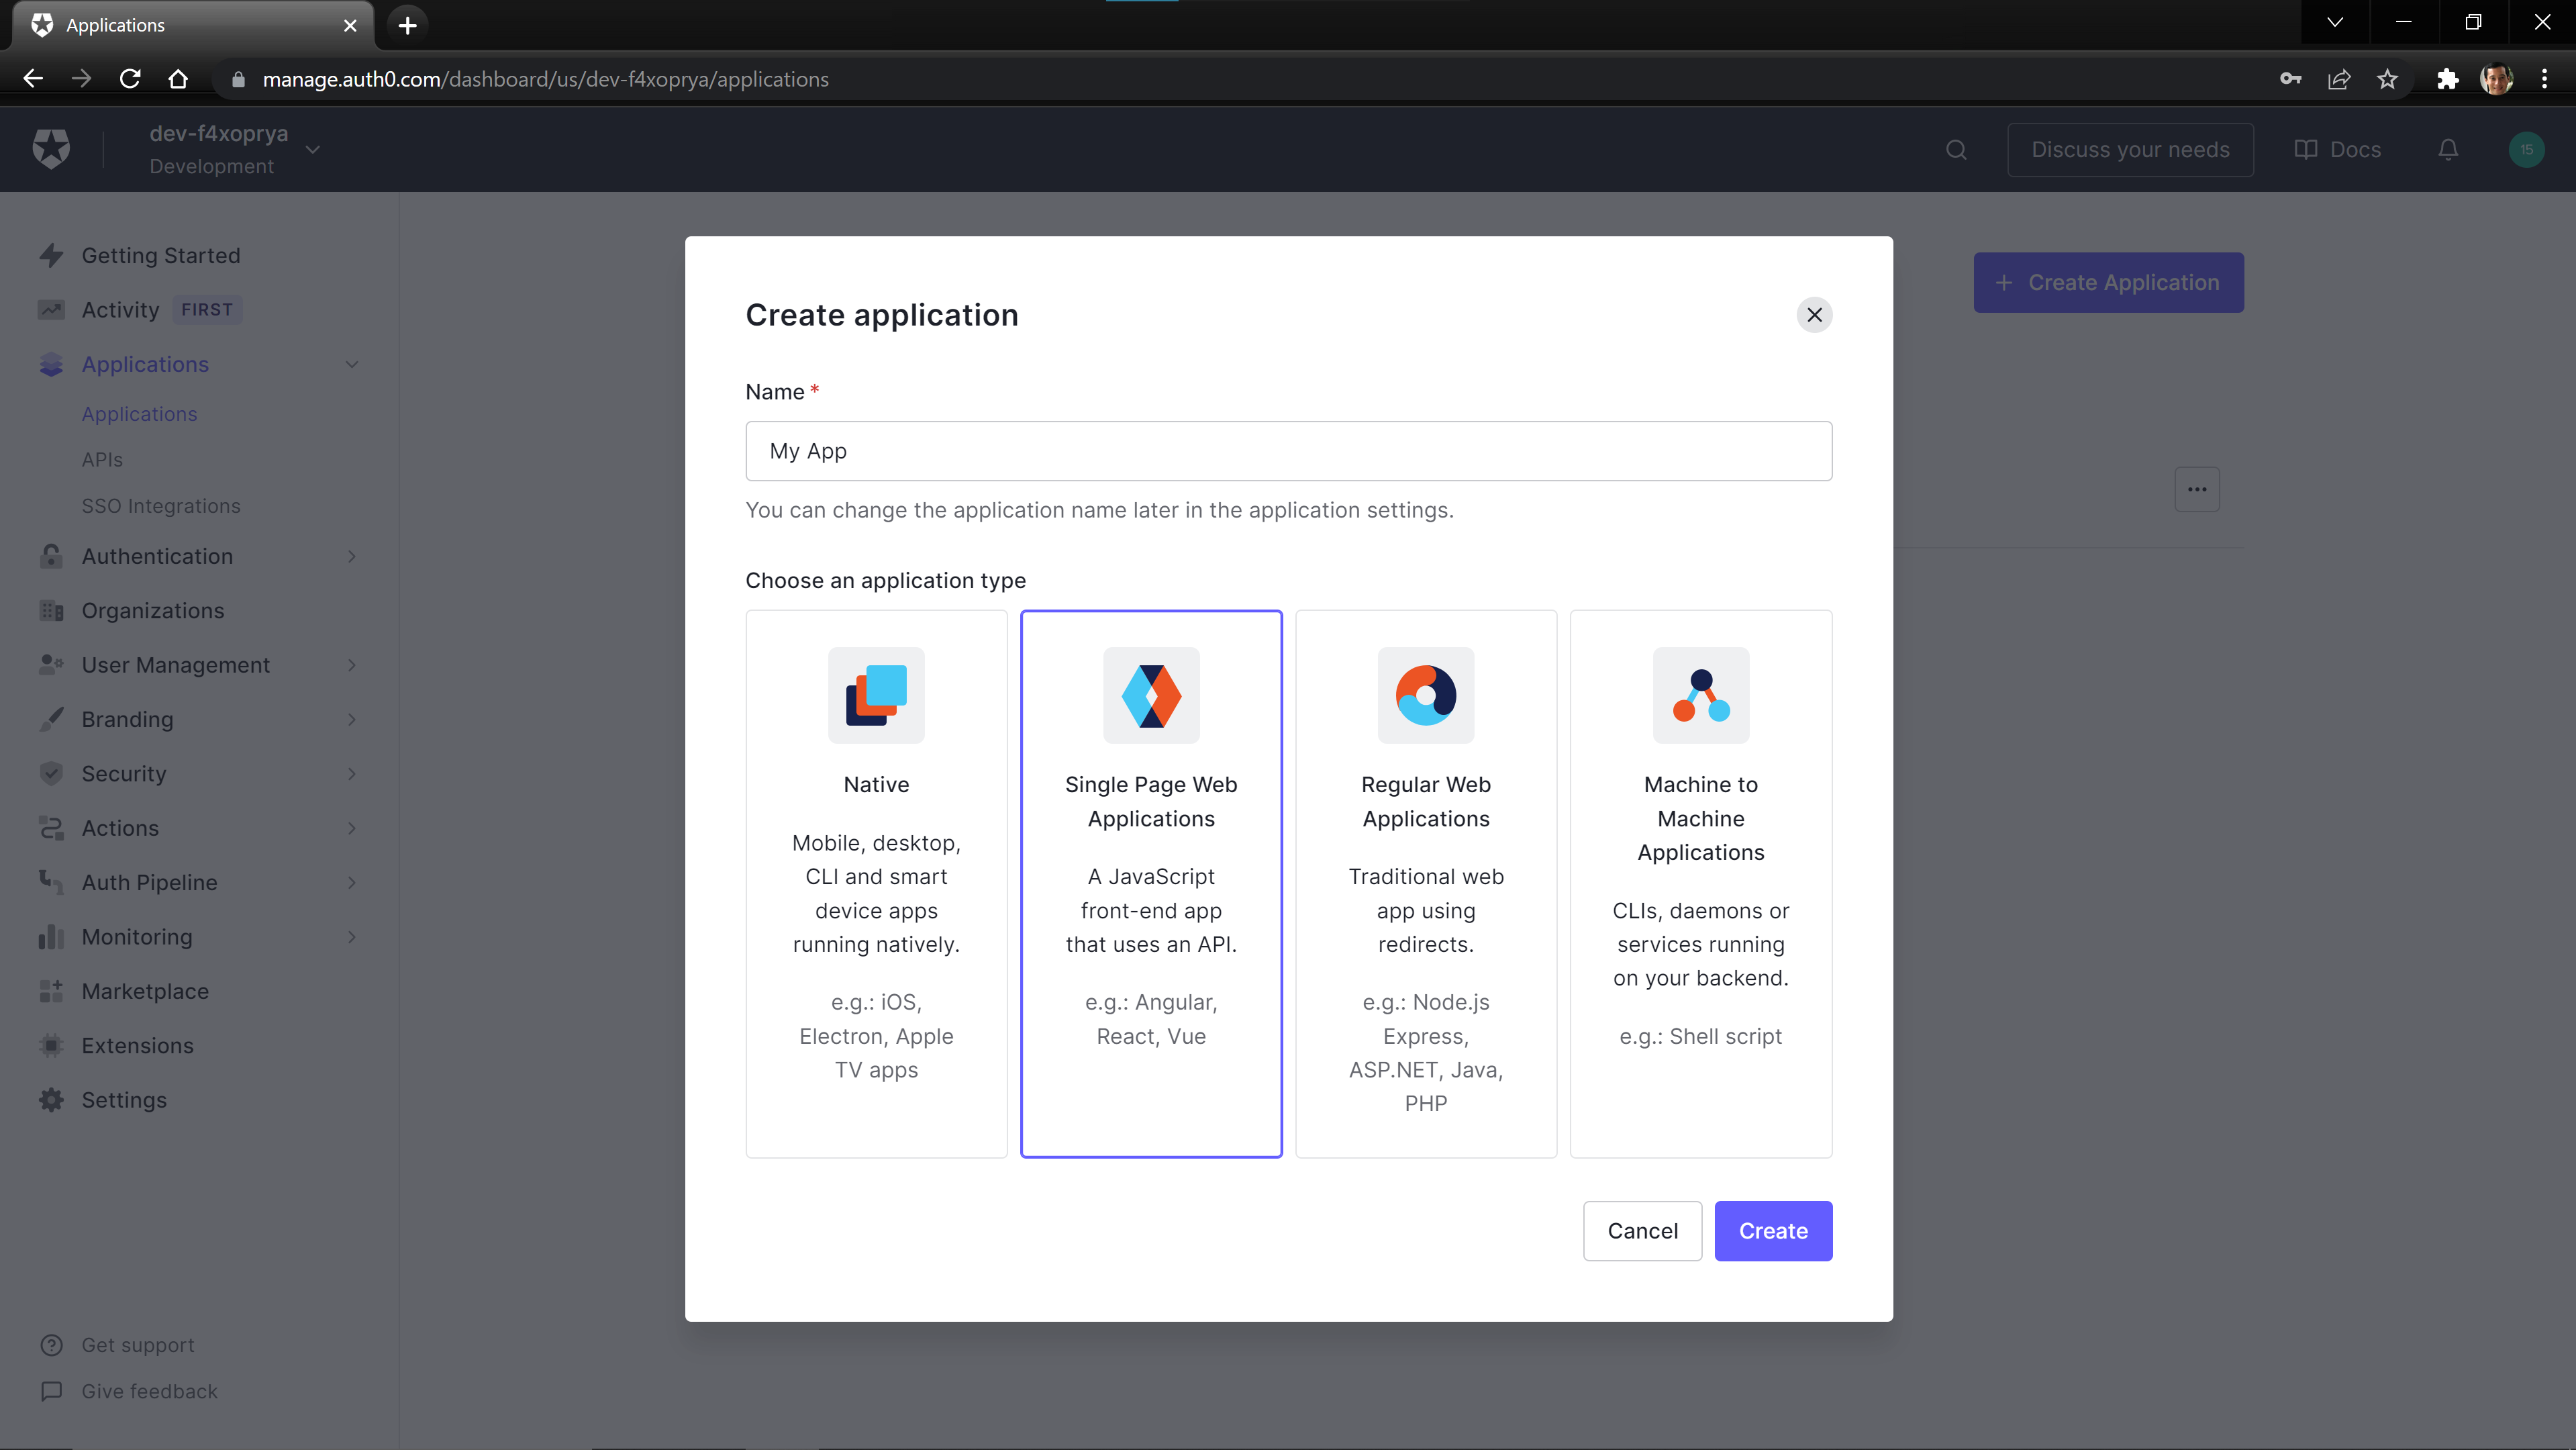
On the Applications > Applications page, create a Single Page Application (SPA).
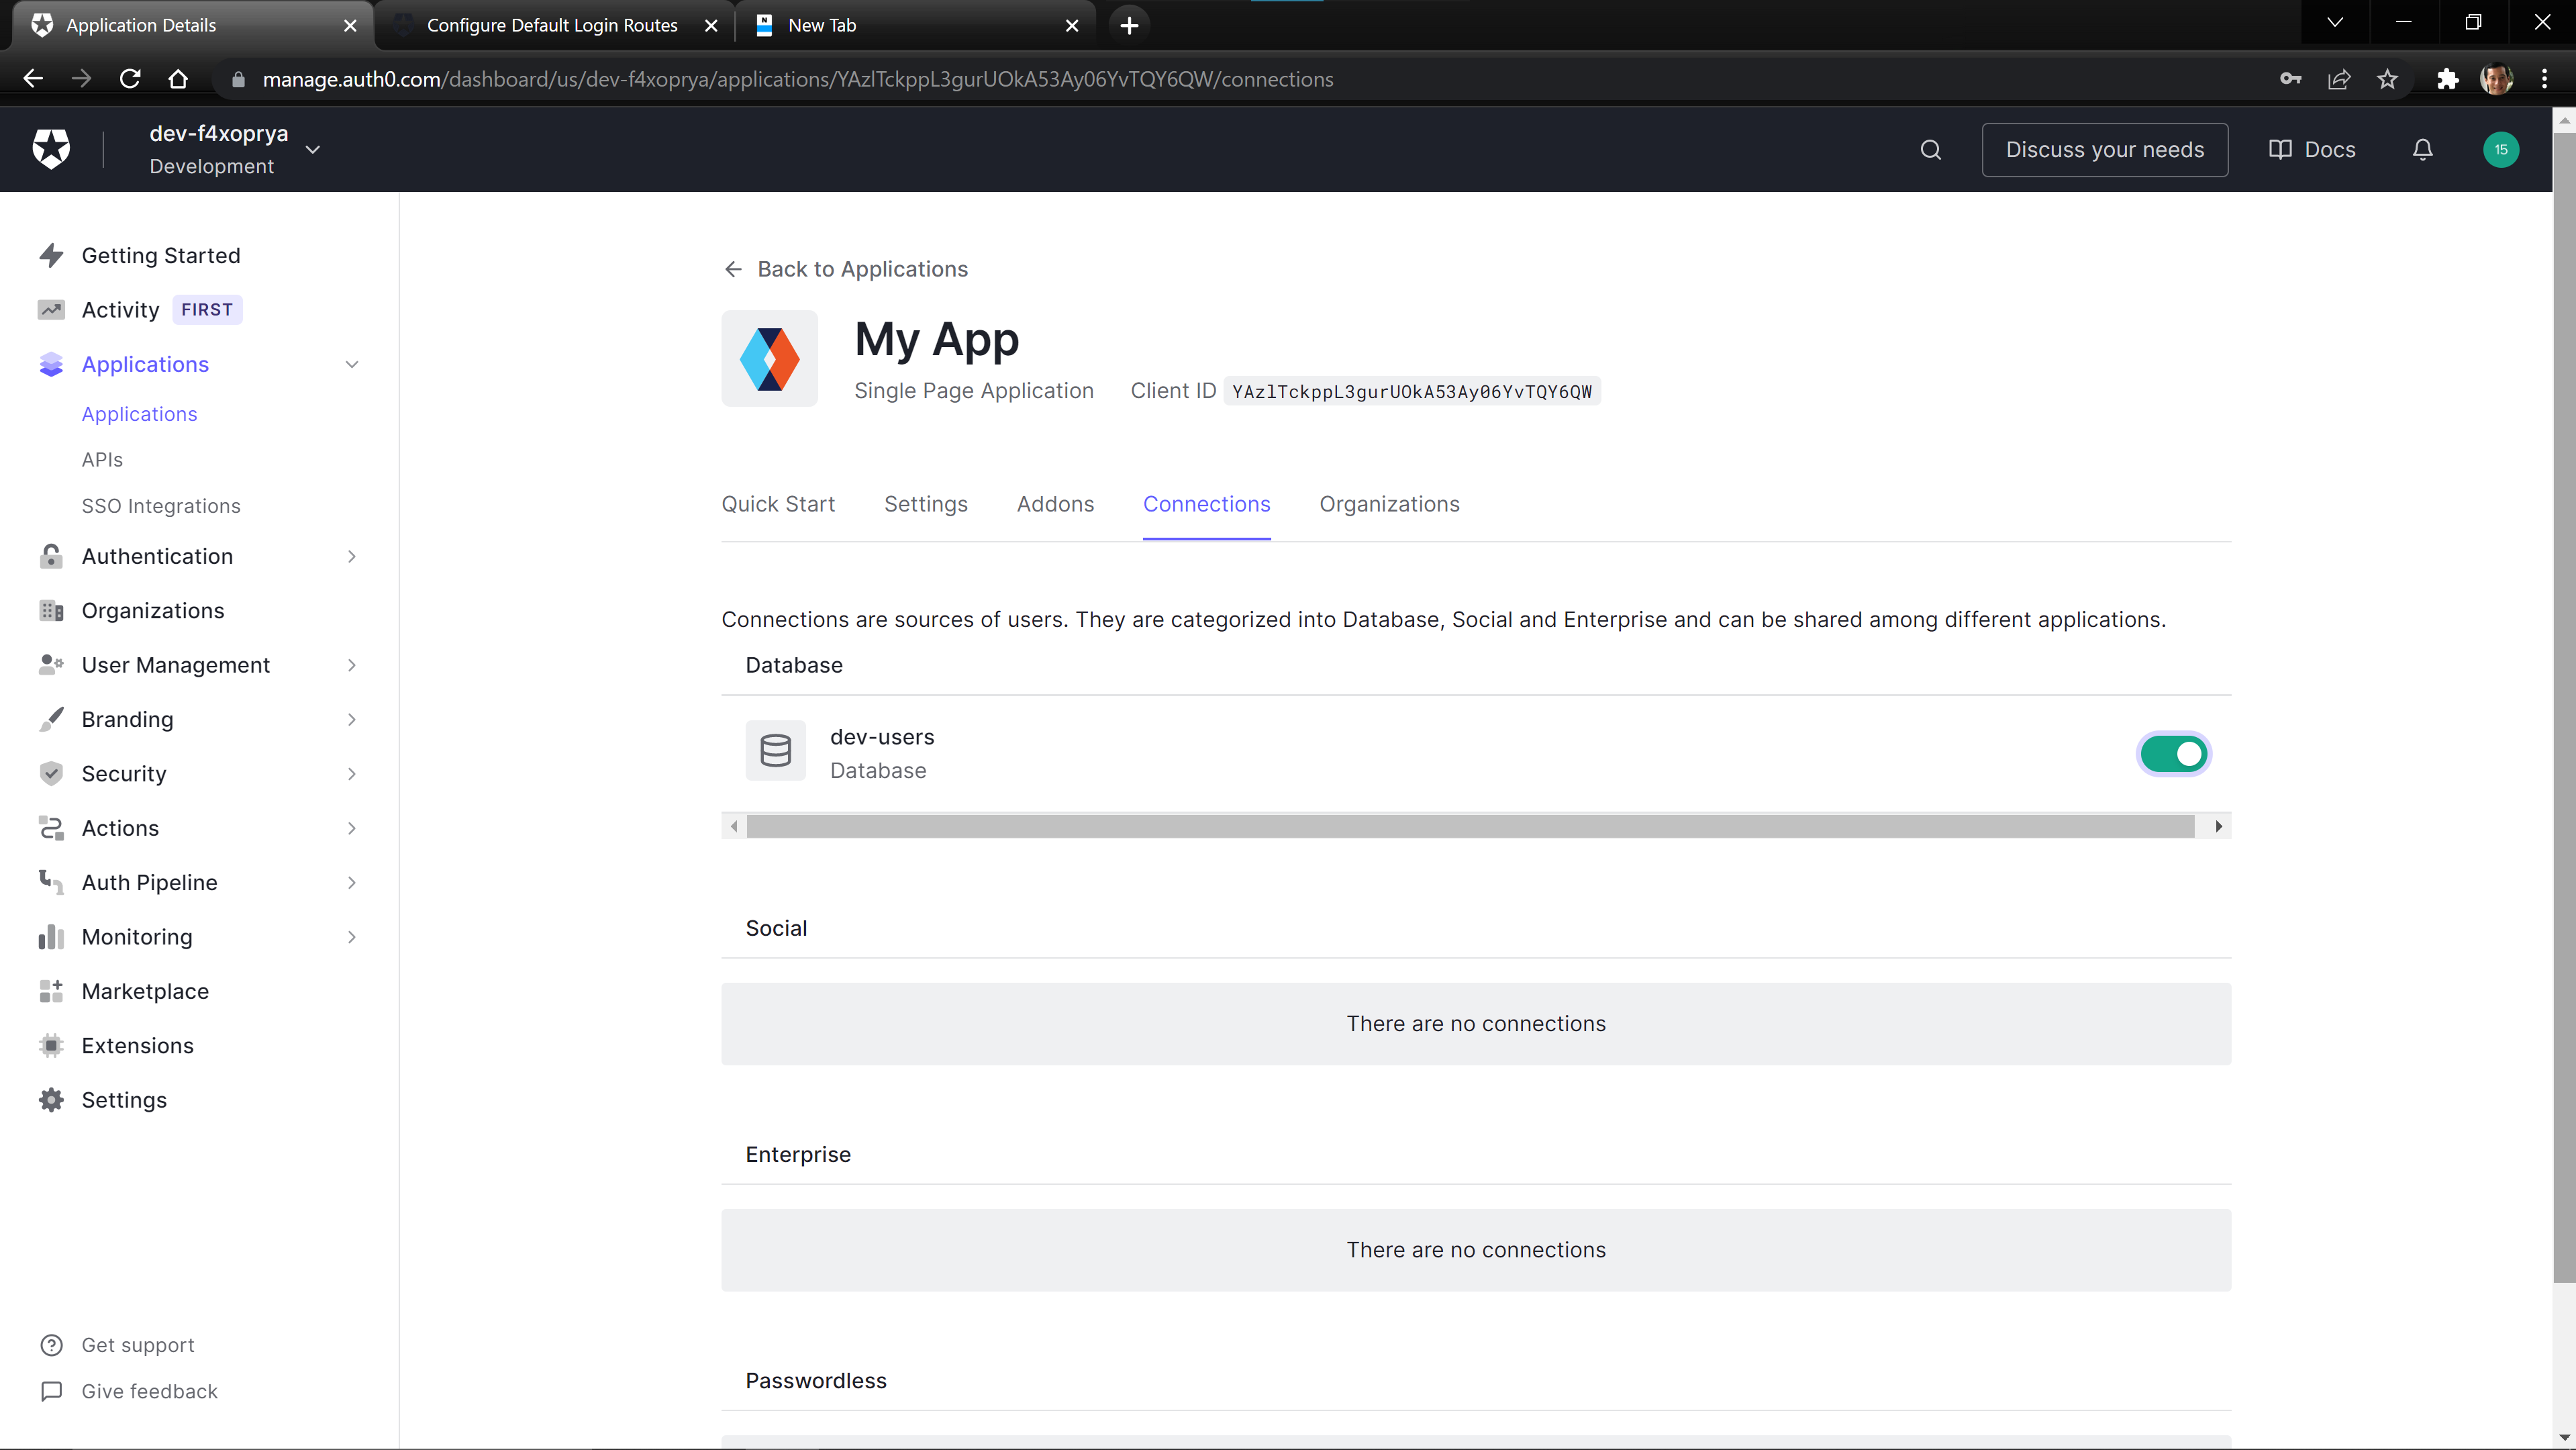
Once created, navigate to the connections tab for your created SPA, and enable the created database for this application.
Connecting the Frontend to Auth0
Before deploying our code to the Static Site resource, we need to add some information to connect the site to Auth0. We need to fill out the values in the src/content/auth_config.json file. When you open the file, it should look like:
{
  "domain": "",
  "clientId": "",
  "audience": "",
  "api_endpoint": ""
}
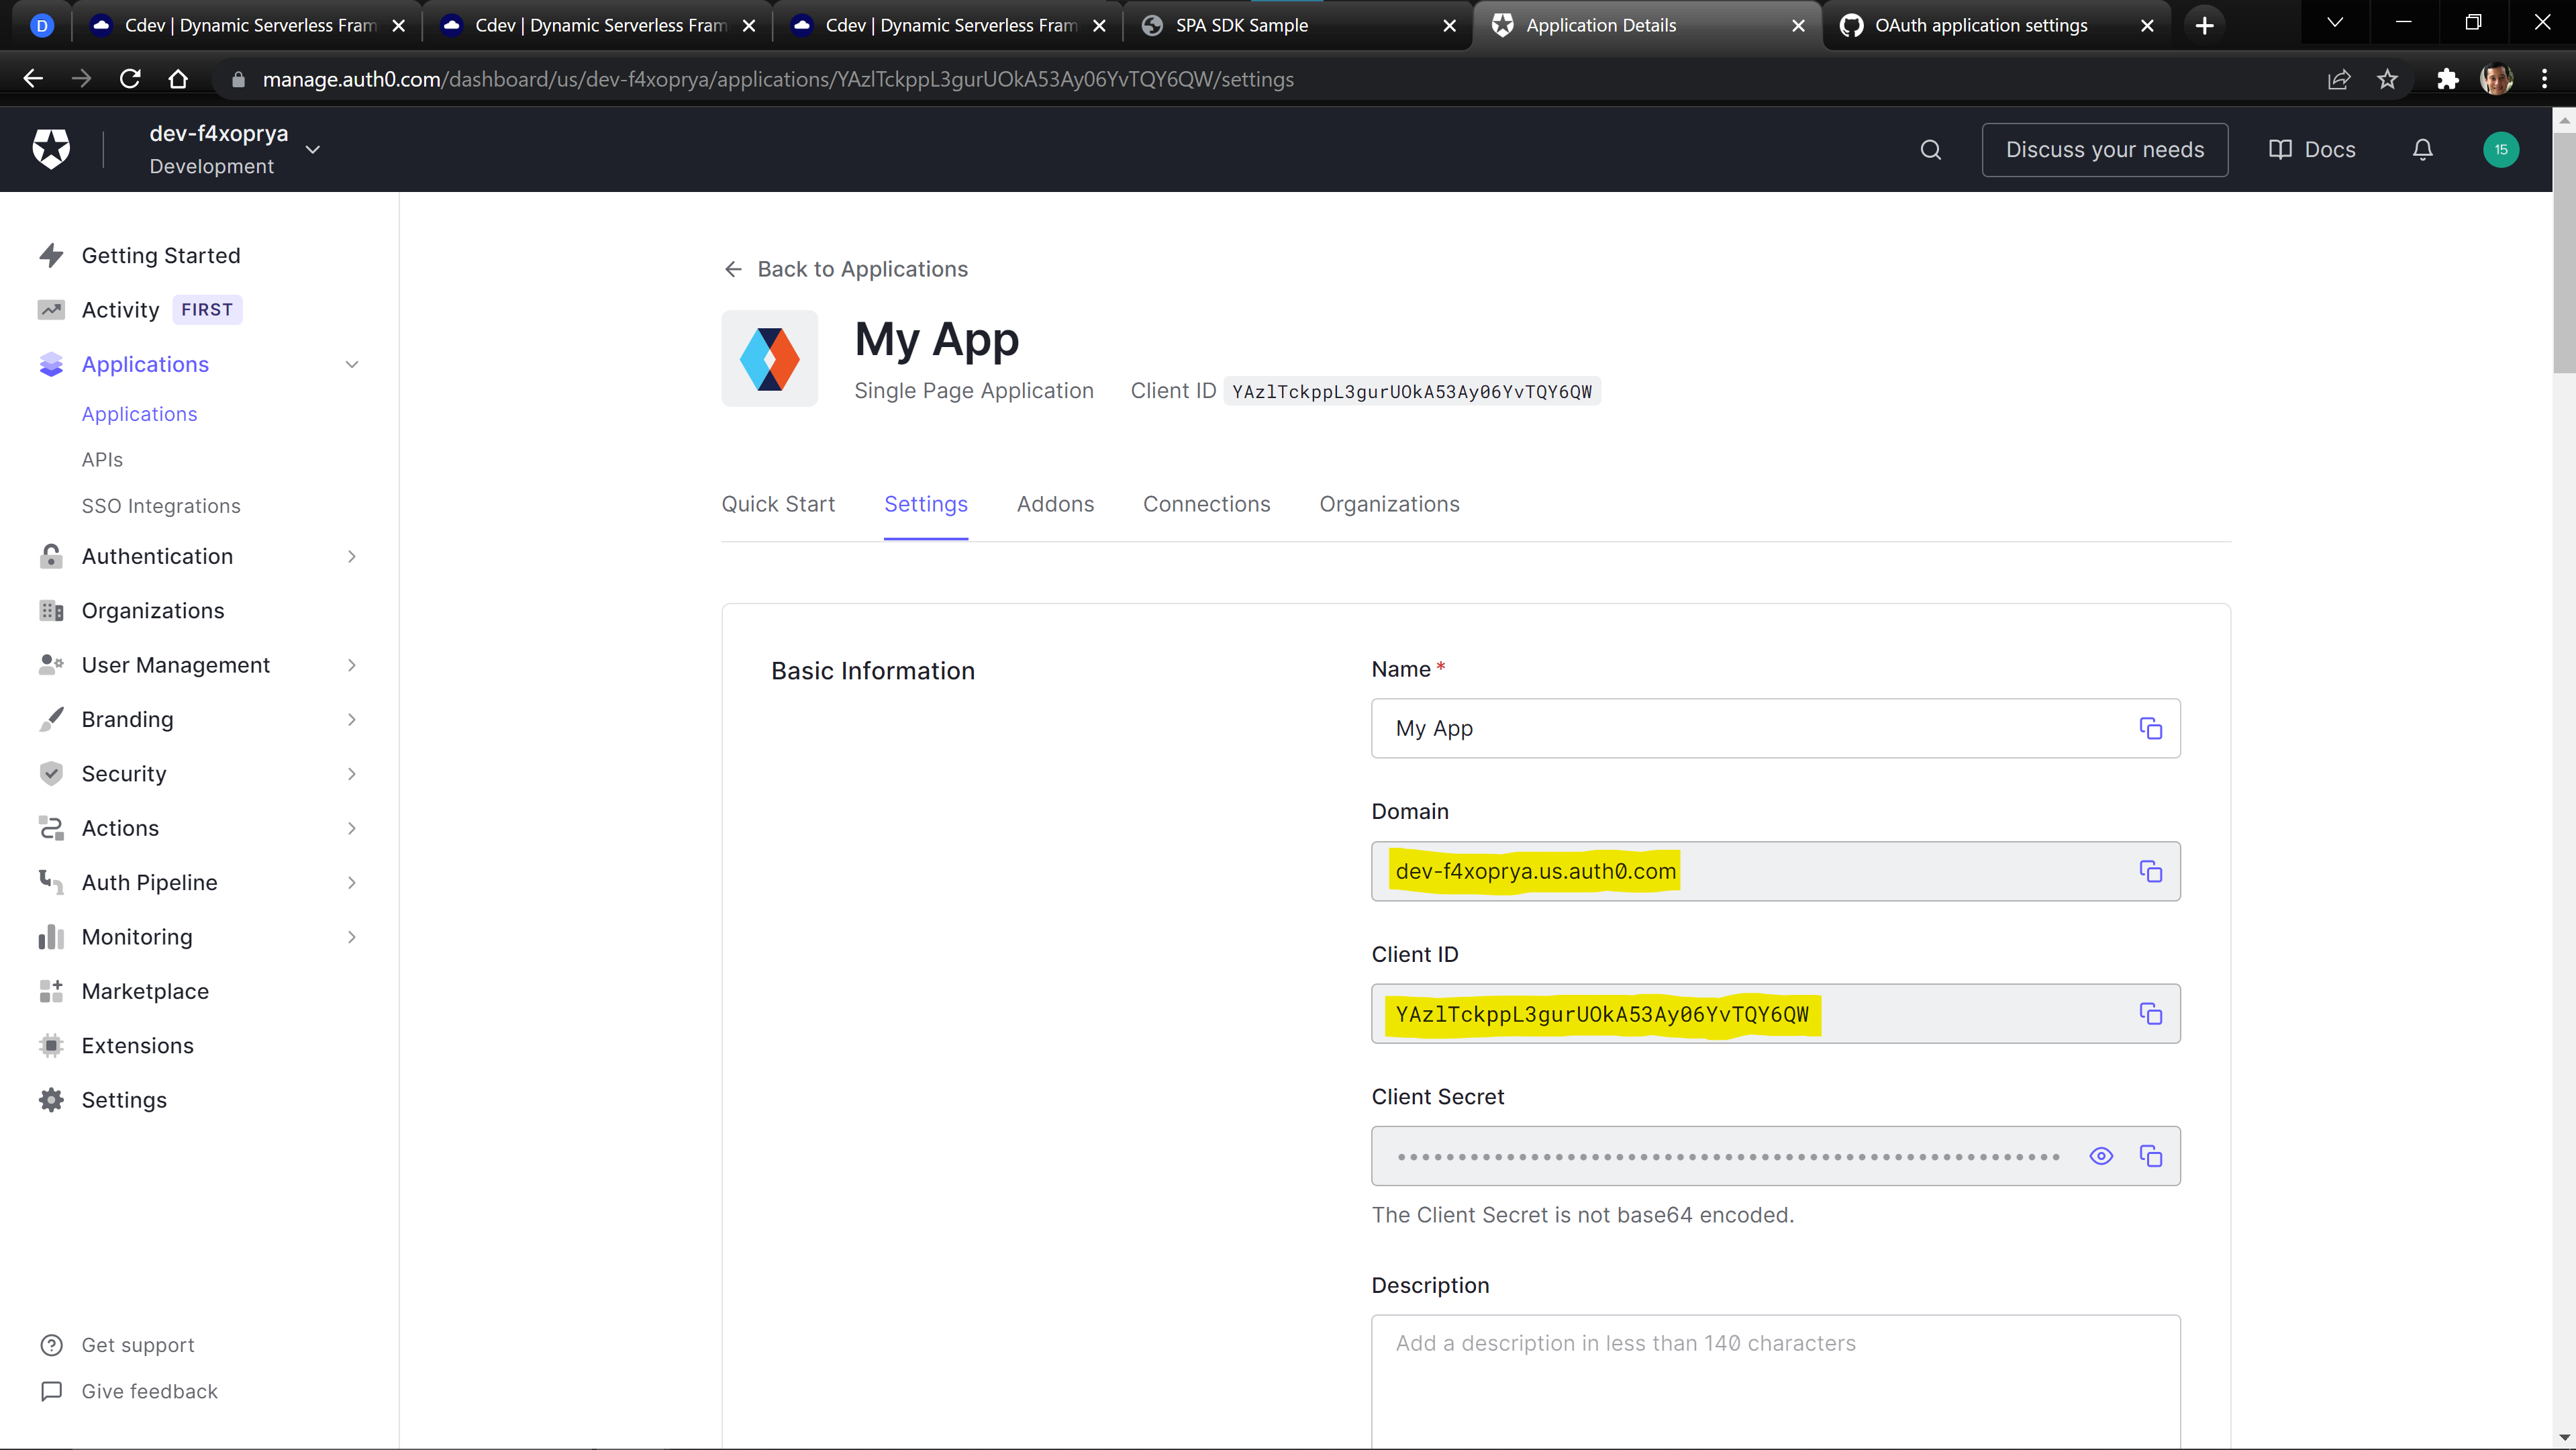
We can find the domain and clientId values on Auth0 in our Application’s Settings Tab.
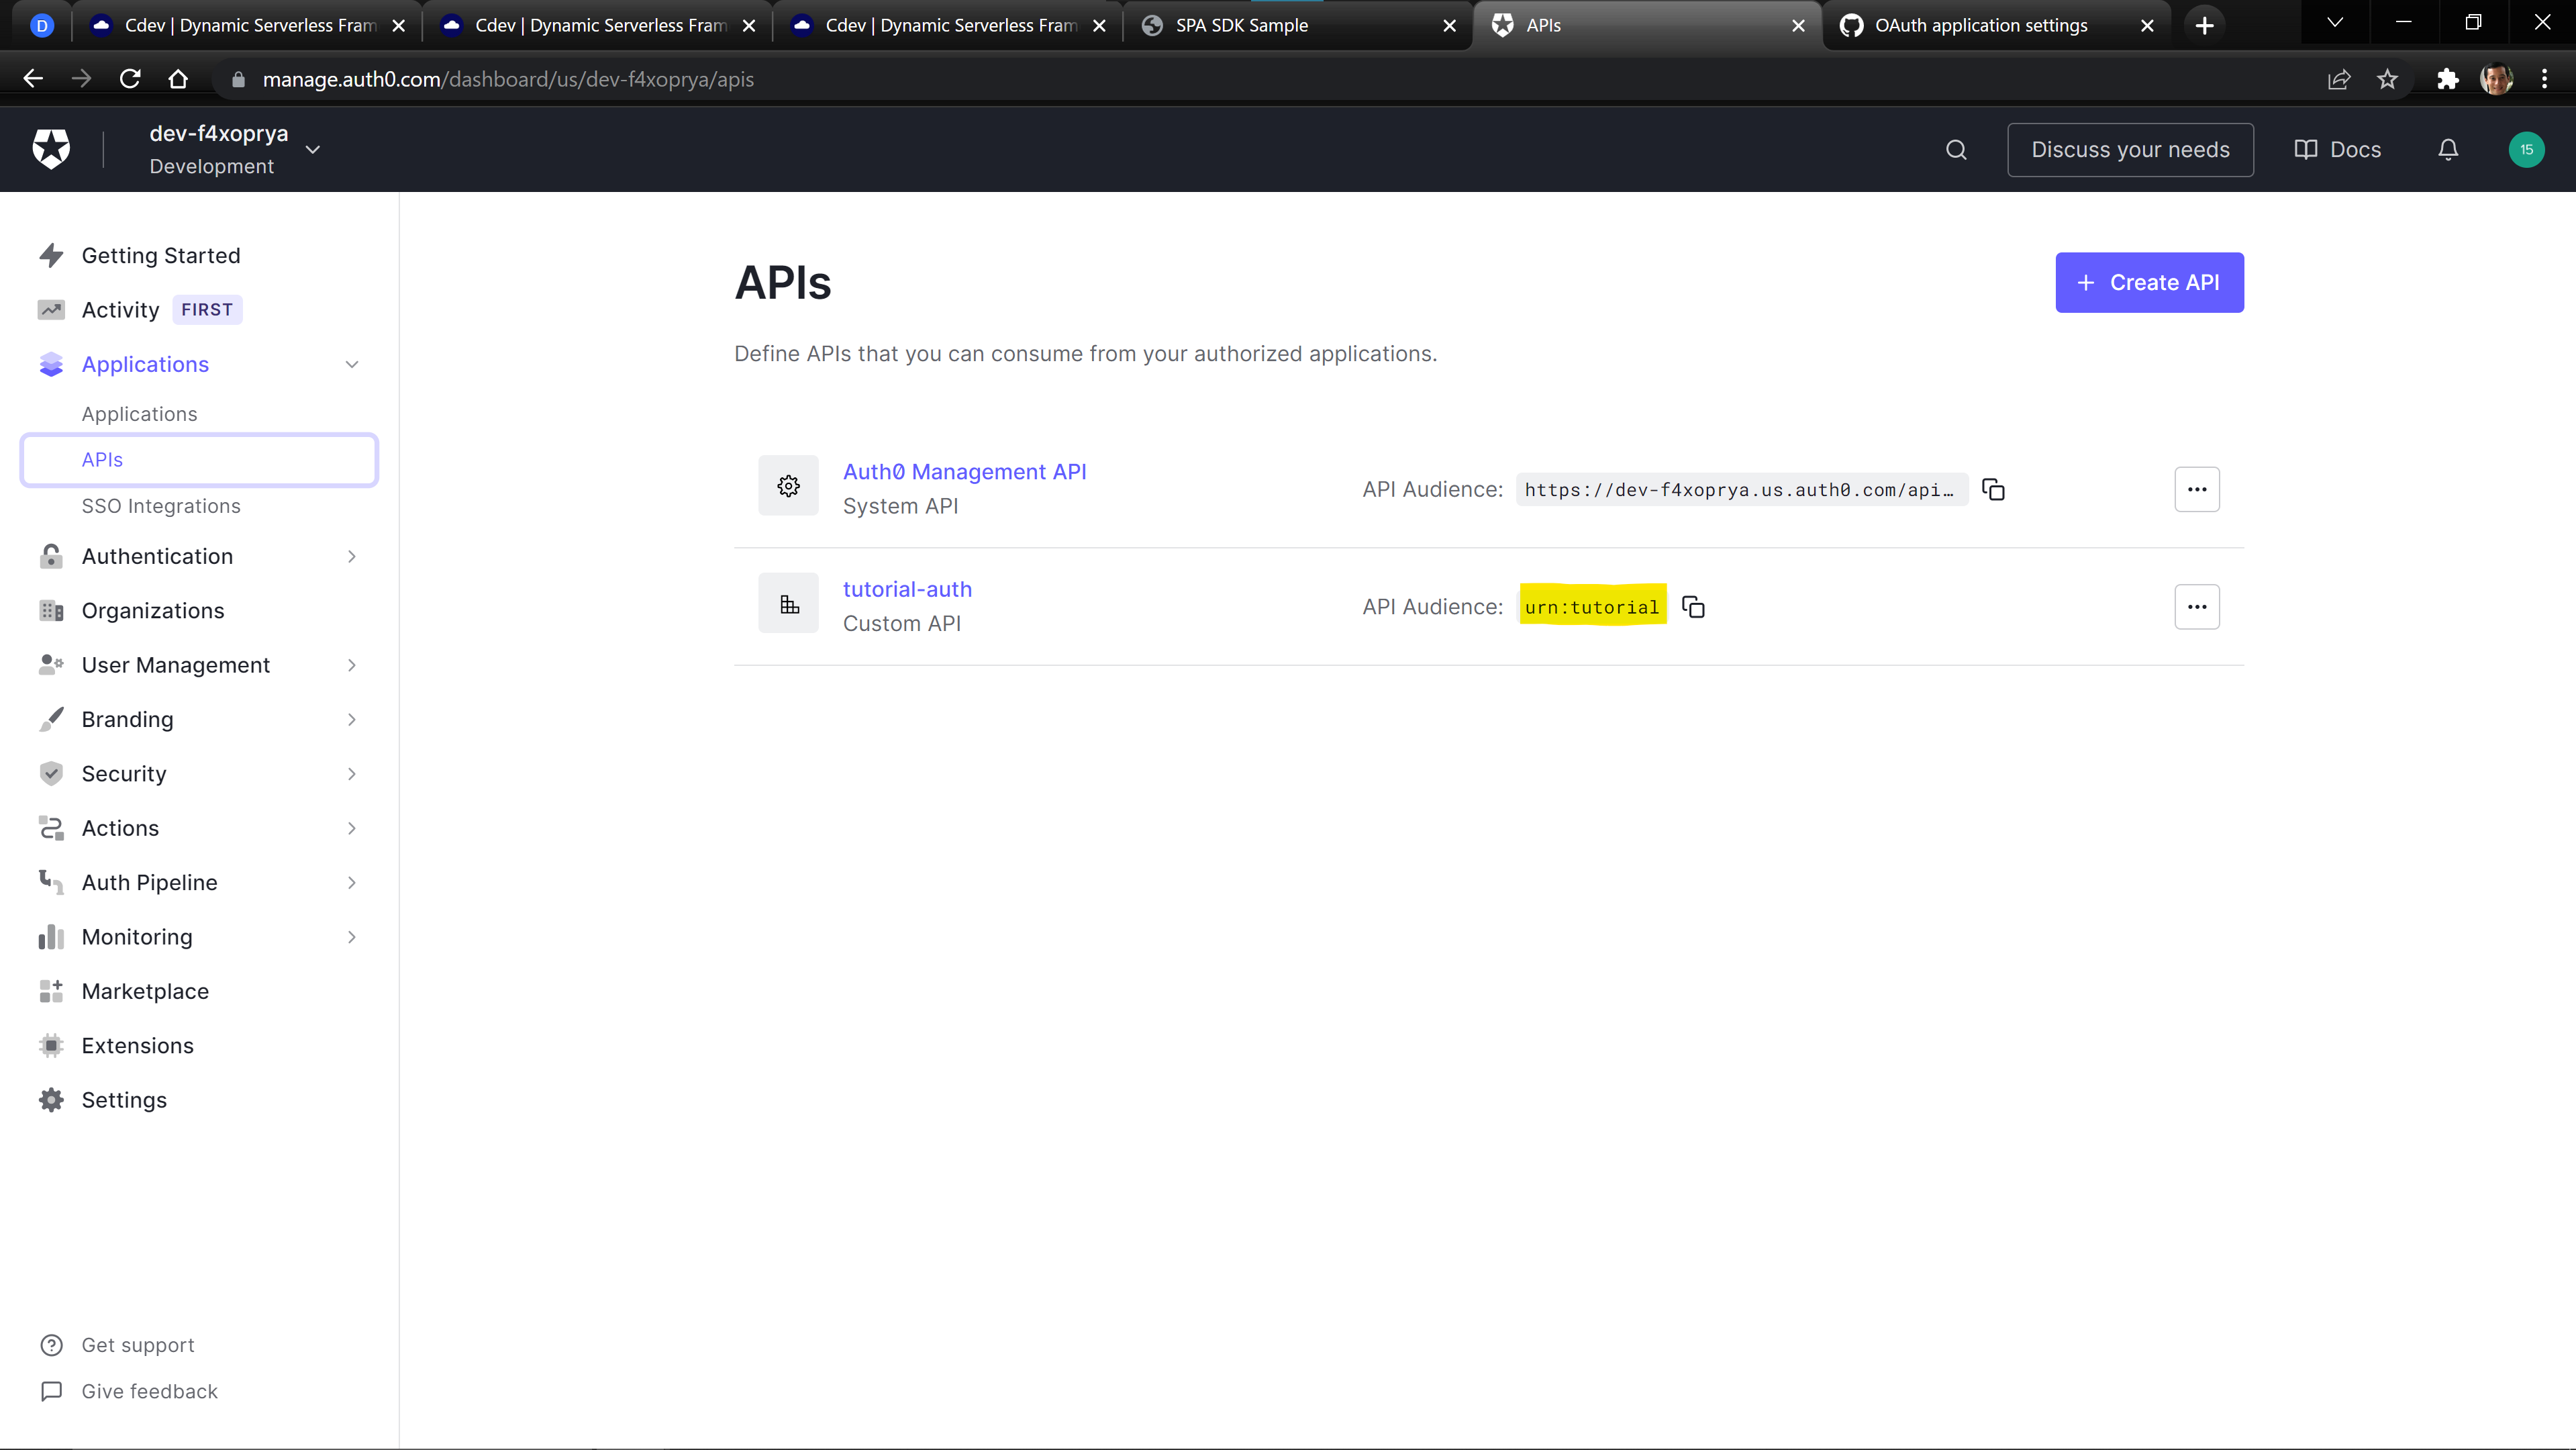
We can find the audience value by going to the Applications > APIs page.
The api_endpoint can be found by running the following Cdev Command:
cdev output user_auth.api.demoapi.endpoint
Your final src/content/auth_config.json file should be filled out and look similar to:
{
  "domain": "dev-f4xoprya.us.auth0.com",
  "clientId": "YAzlTckppL3gurUOkA53Ay06YvTQY6QW",
  "audience": "urn:tutorial",
  "api_endpoint": "https://5rqurtix69.execute-api.us-east-1.amazonaws.com/live"
}
Our final step is to register the url of our frontend with Auth0. You can get your url by running the following command:
cdev output user_auth.staticsite.demofrontend.site_url
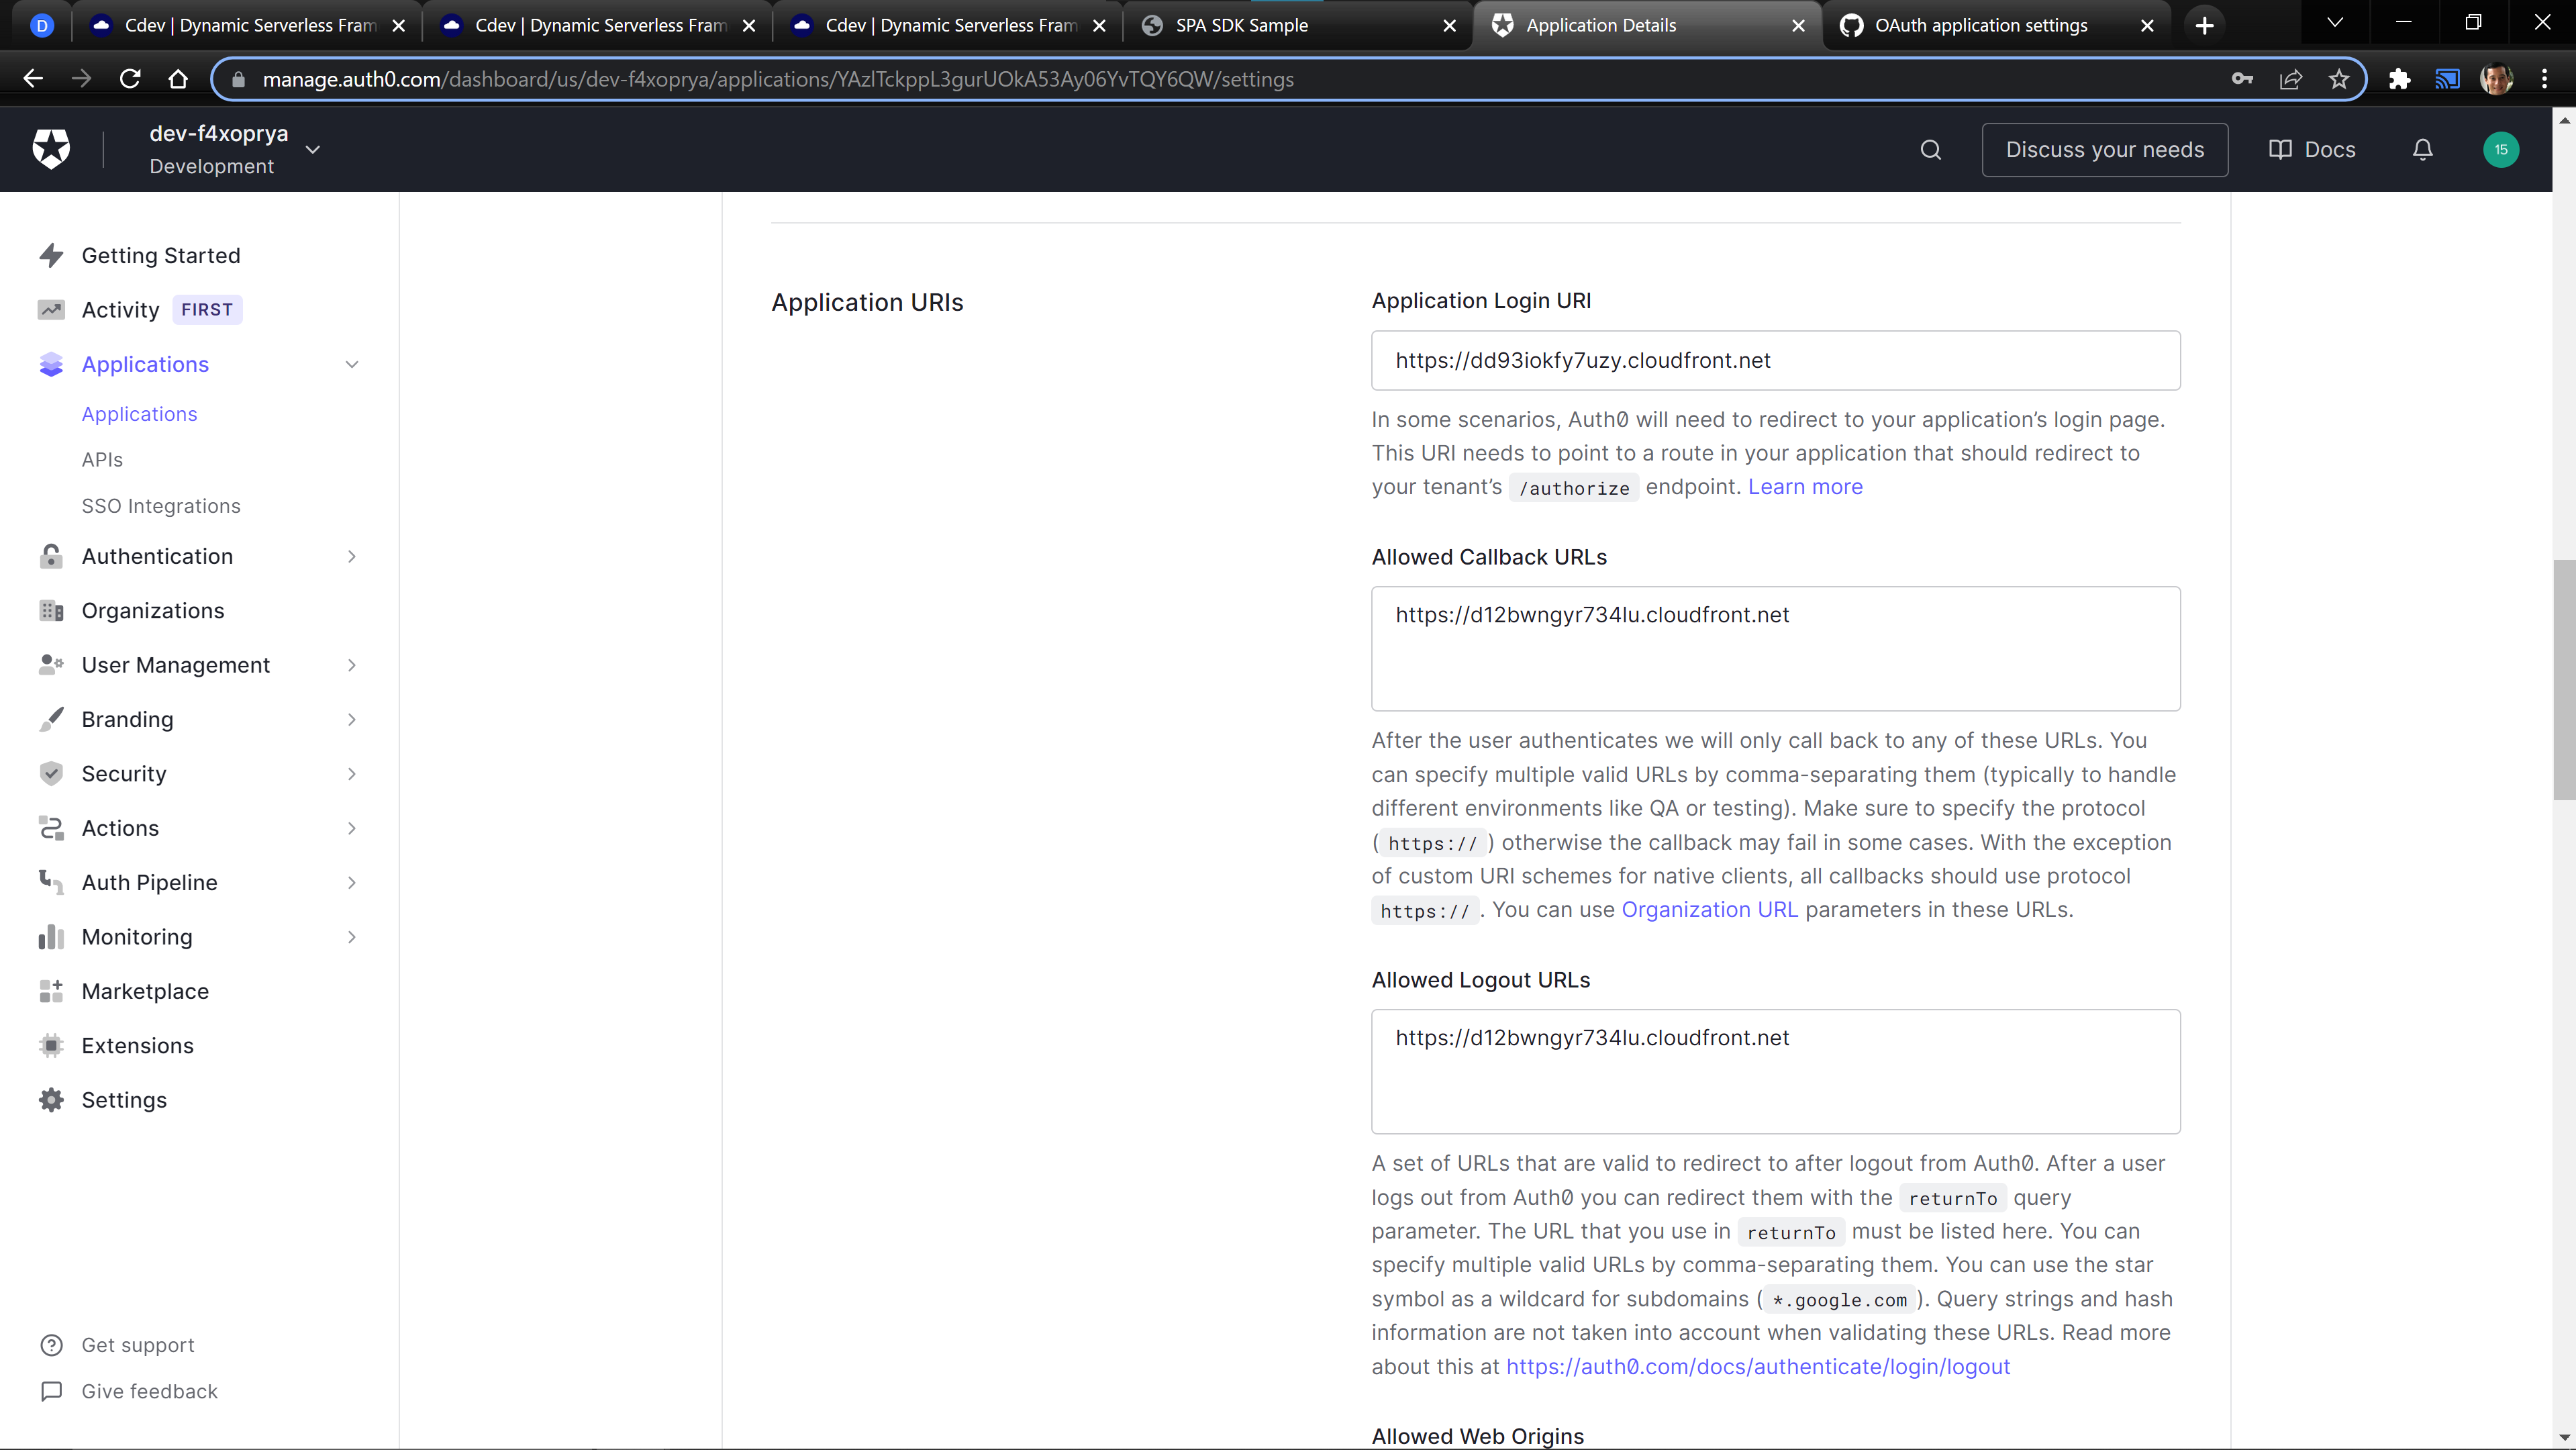
In your Settings tab on your Application page, add your url to the following boxes: Application Login URI, Allowed Callback URLs, Allowed Logout URLs, Allowed Web Origins, and Allowed Origins (CORS).
Push The Files to Your Site
Now that we have configured Auth0, we can push the demo content to the Static Site using the following command:
cdev run static_site.sync user_auth.demofrontend
You can get the url of your Static Site using the following command.
cdev output user_auth.staticsite.demofrontend.site_url
Now you can visit your site in your web browser!
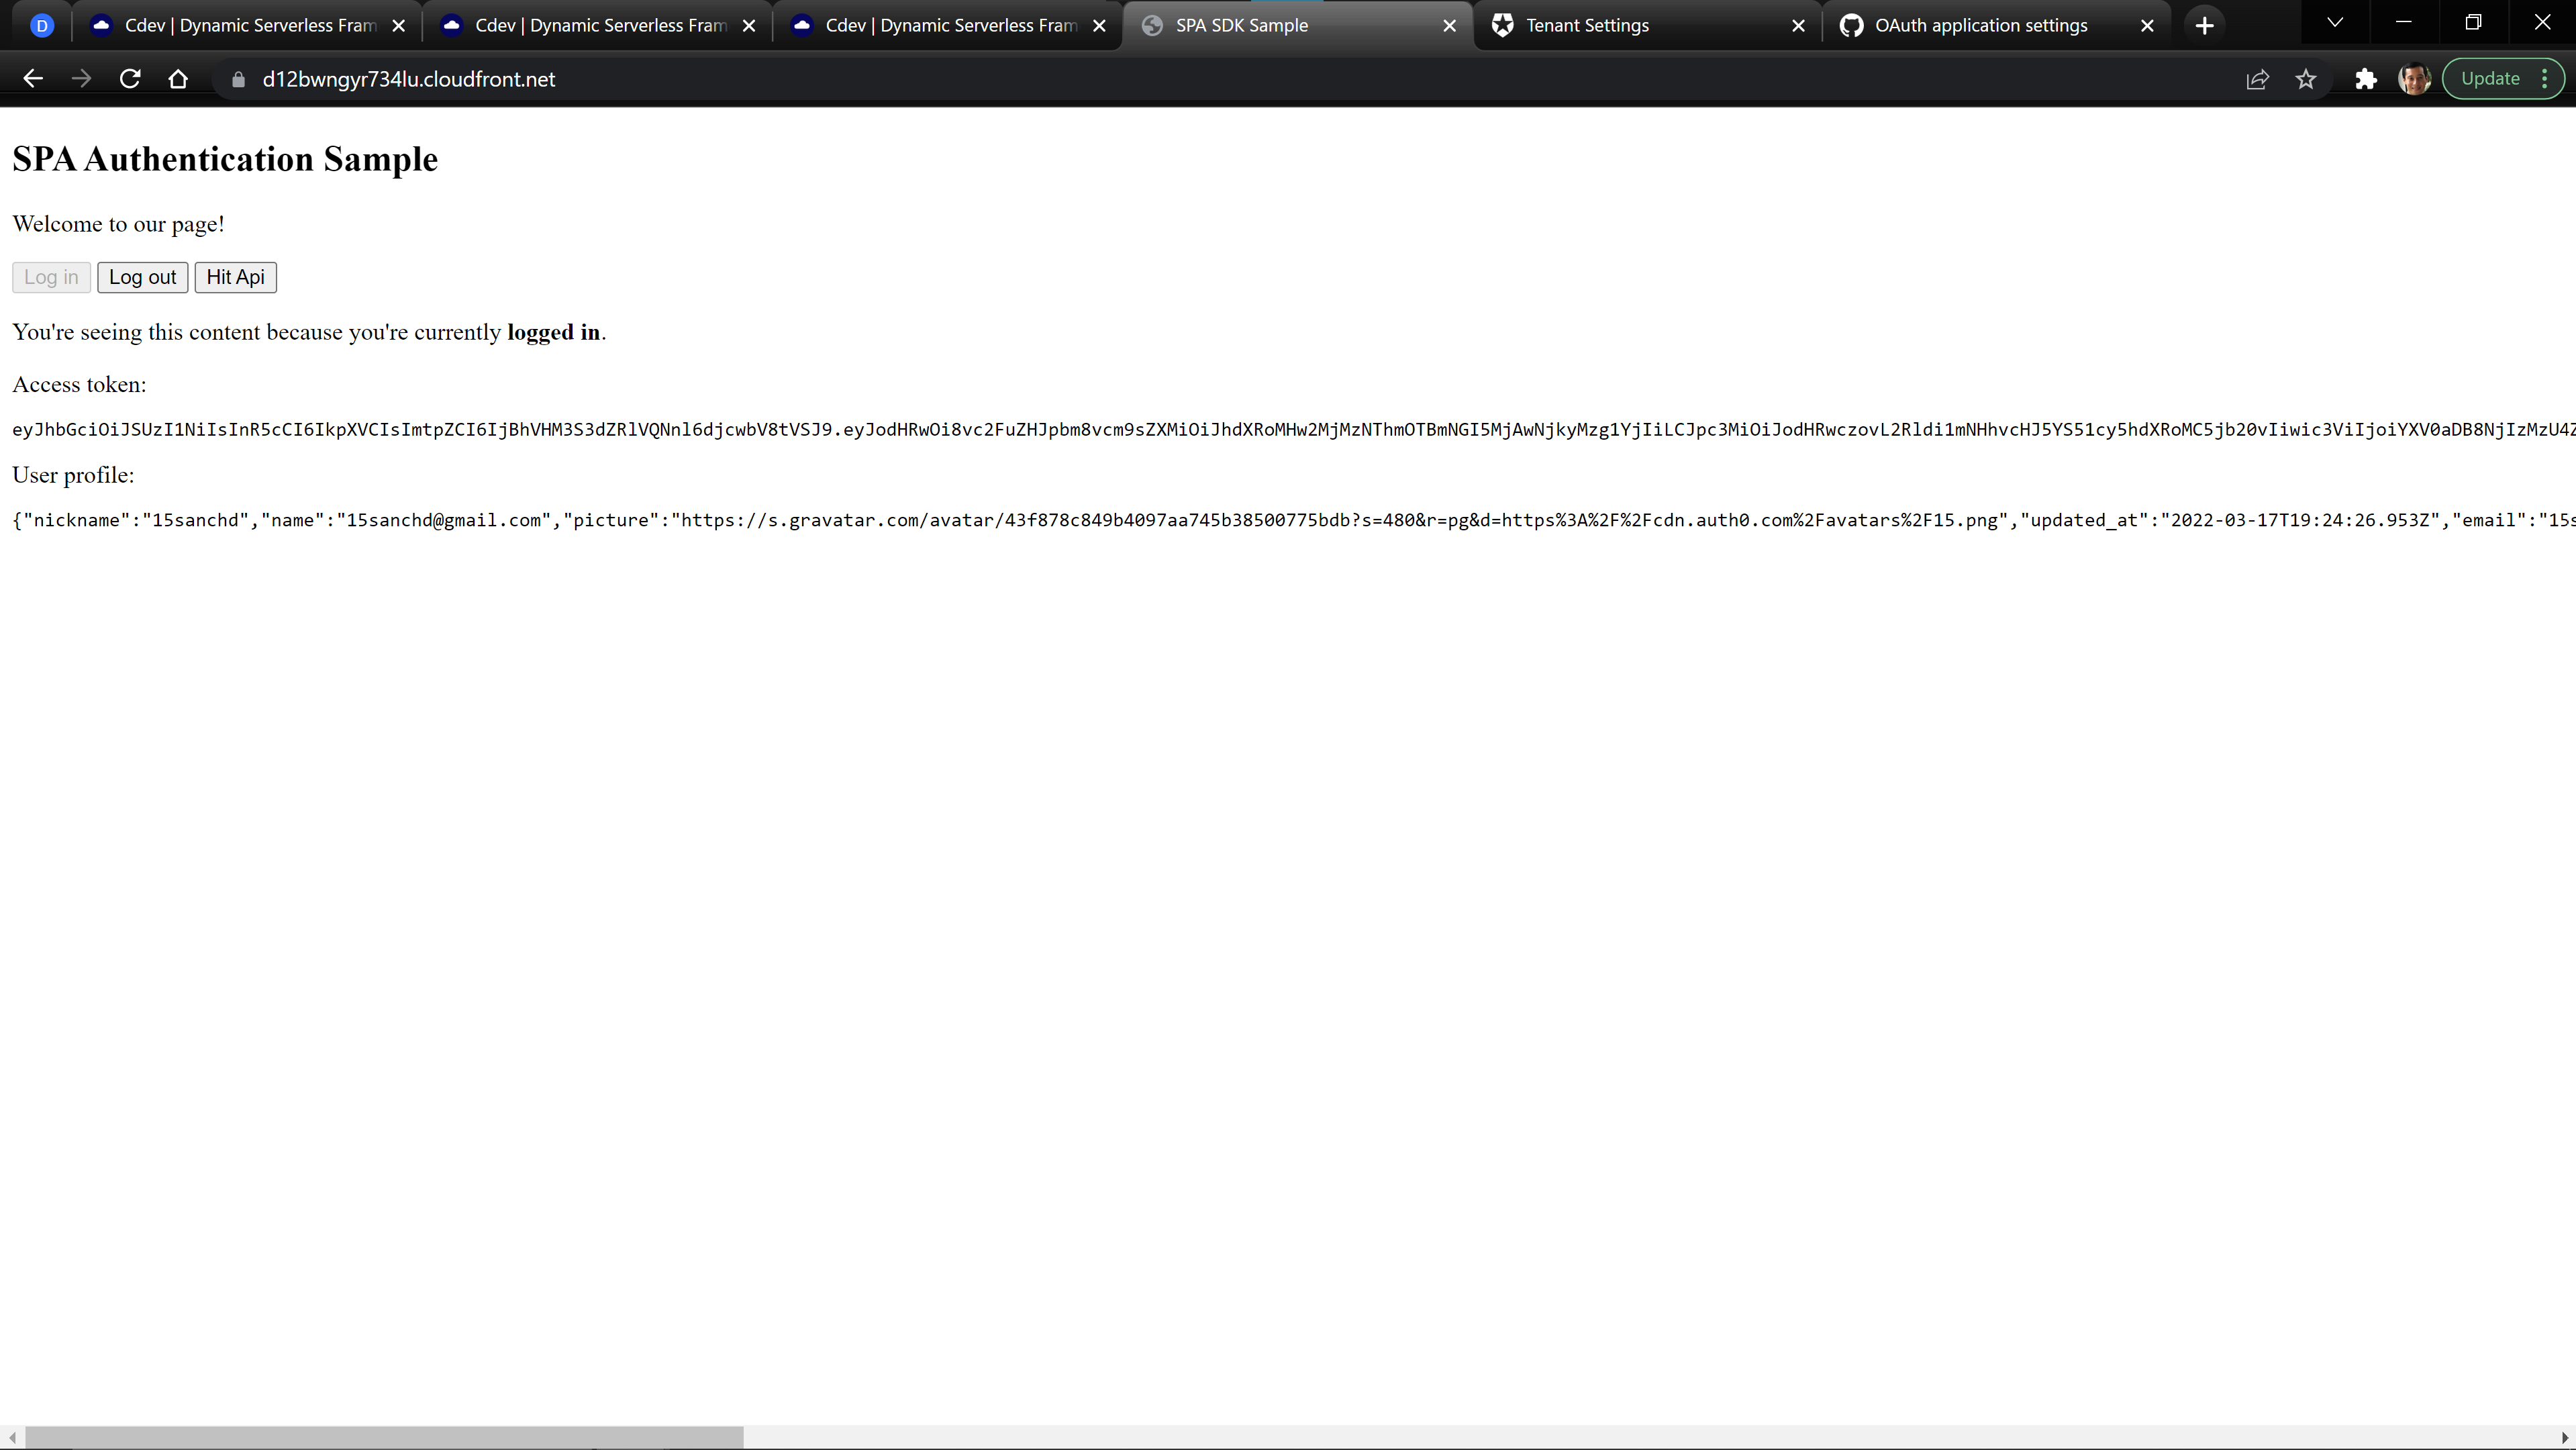
Check Your Site
The provided template site demonstrates the basics of how to login using the Auth0 Javascript SDK and then use the provided JWT to make a call to our API. When you login, the page should look like:
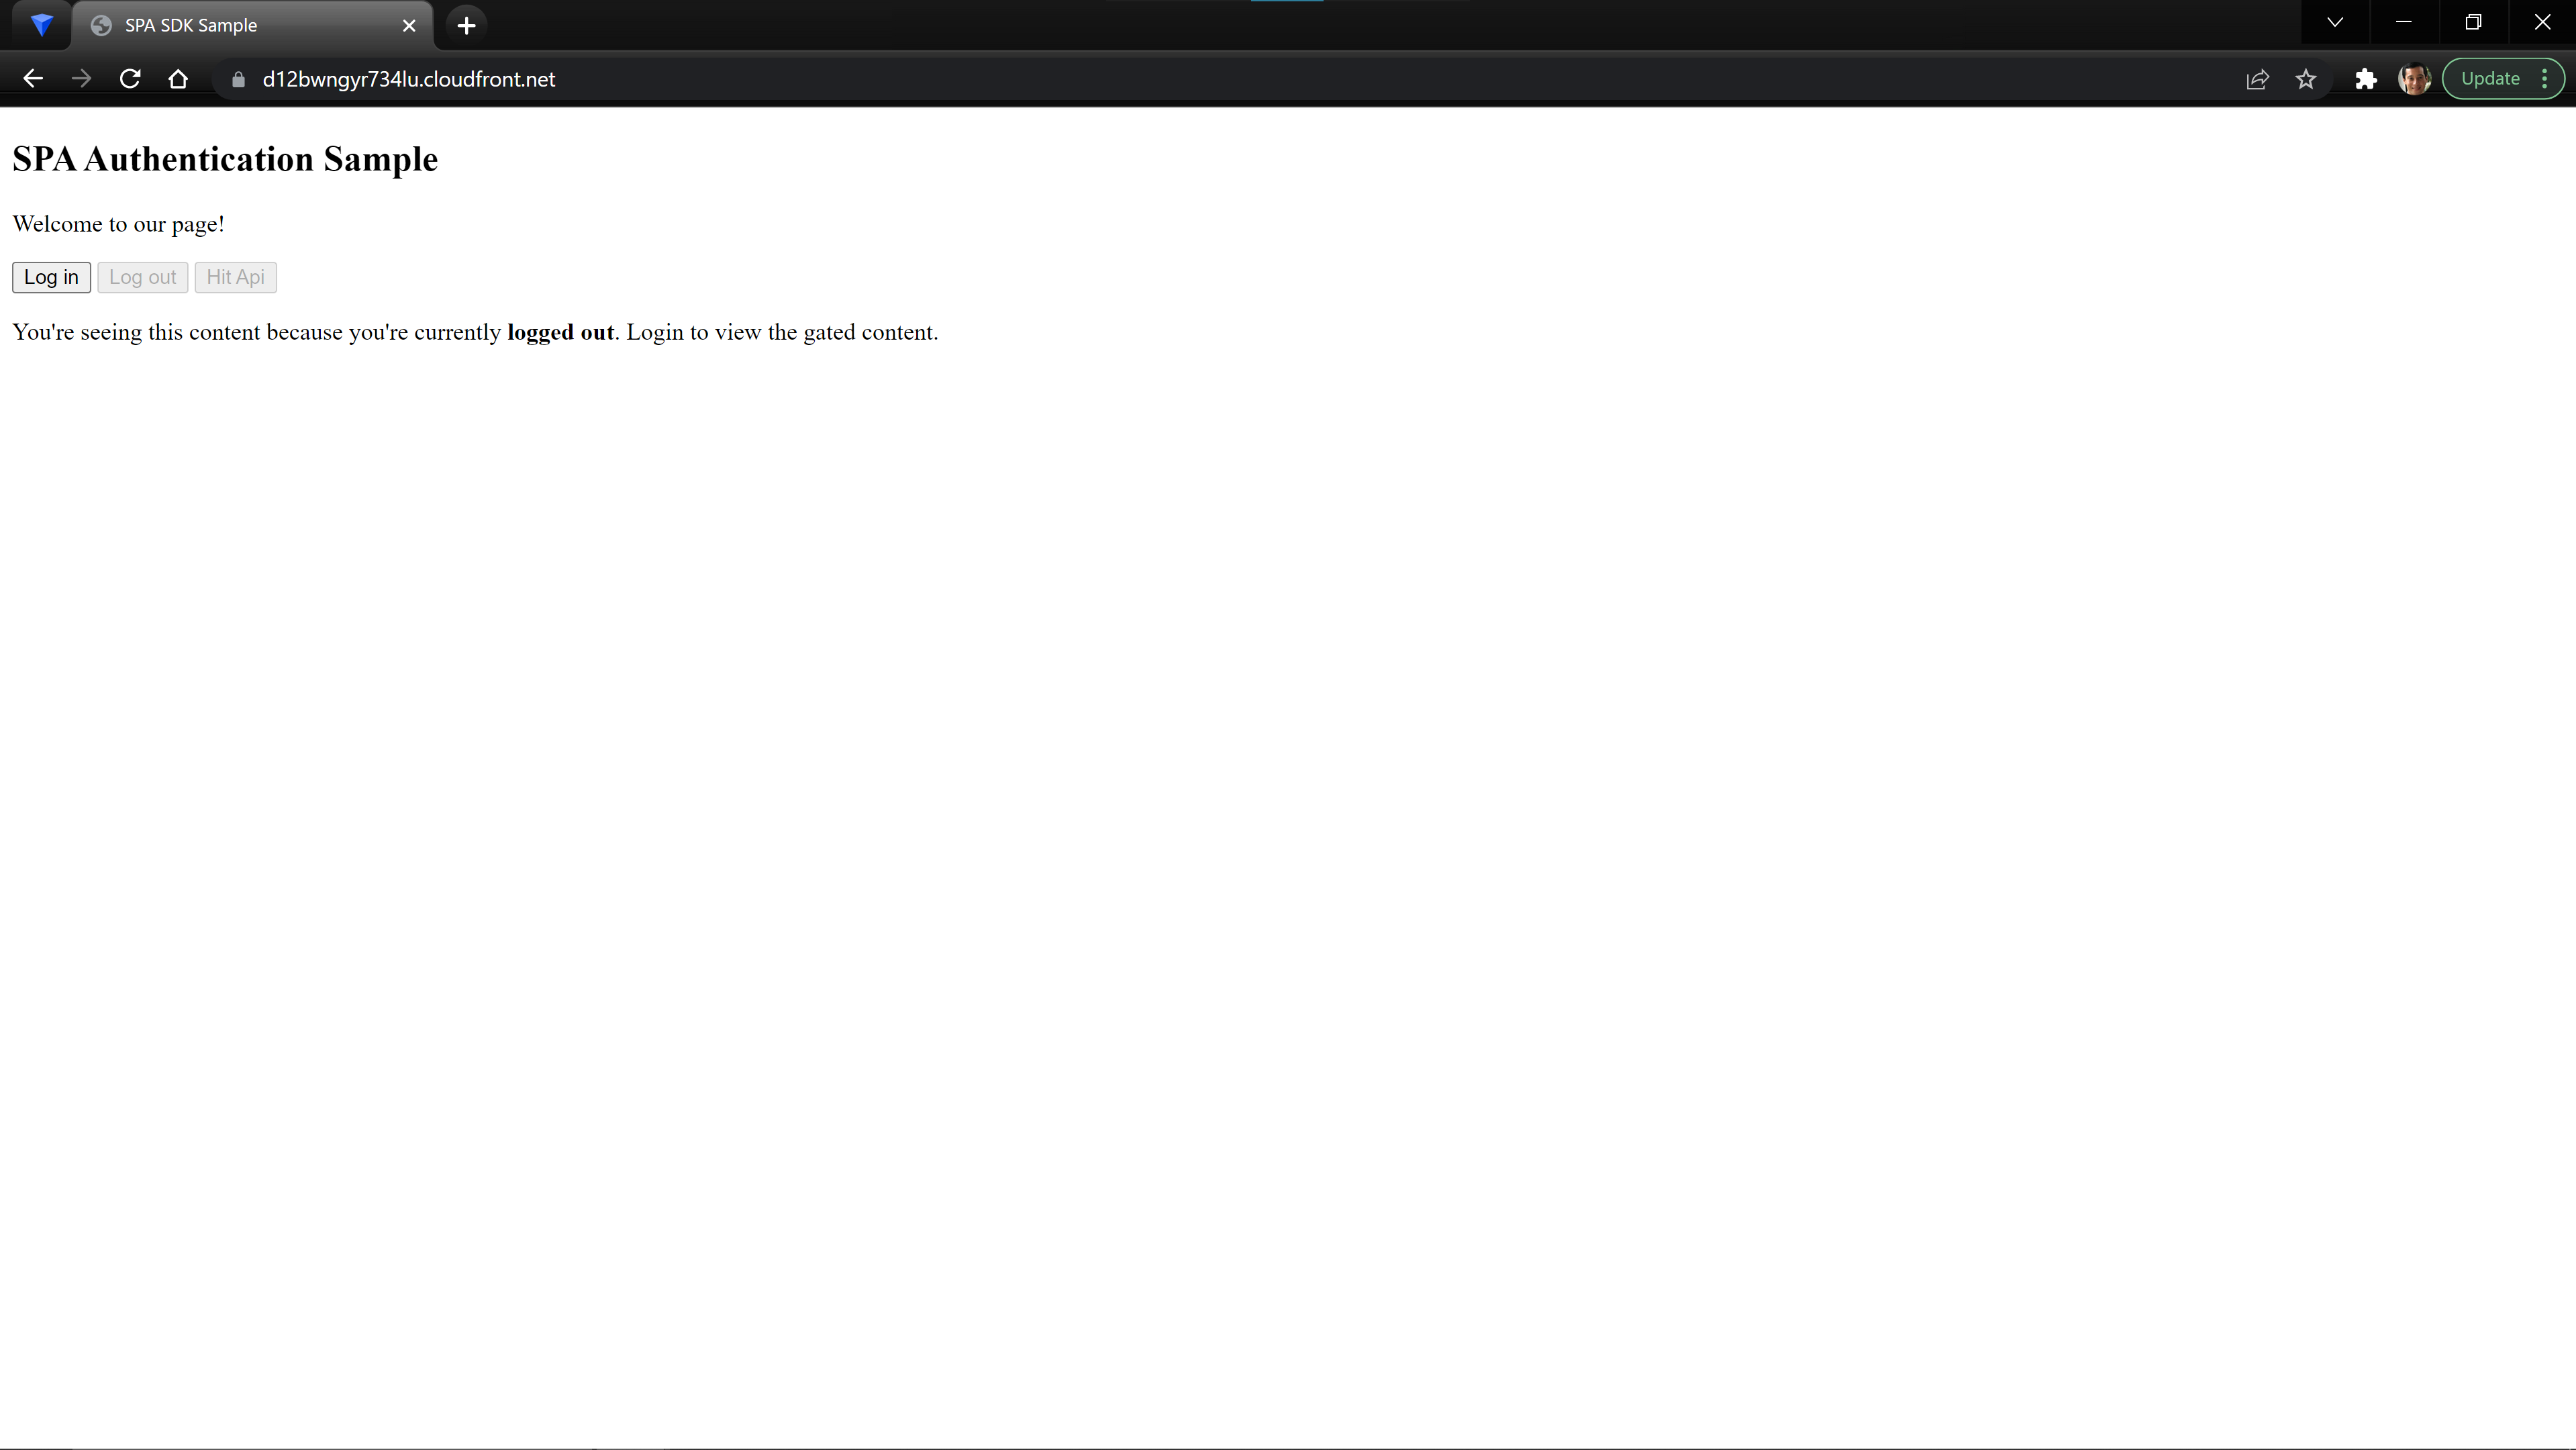
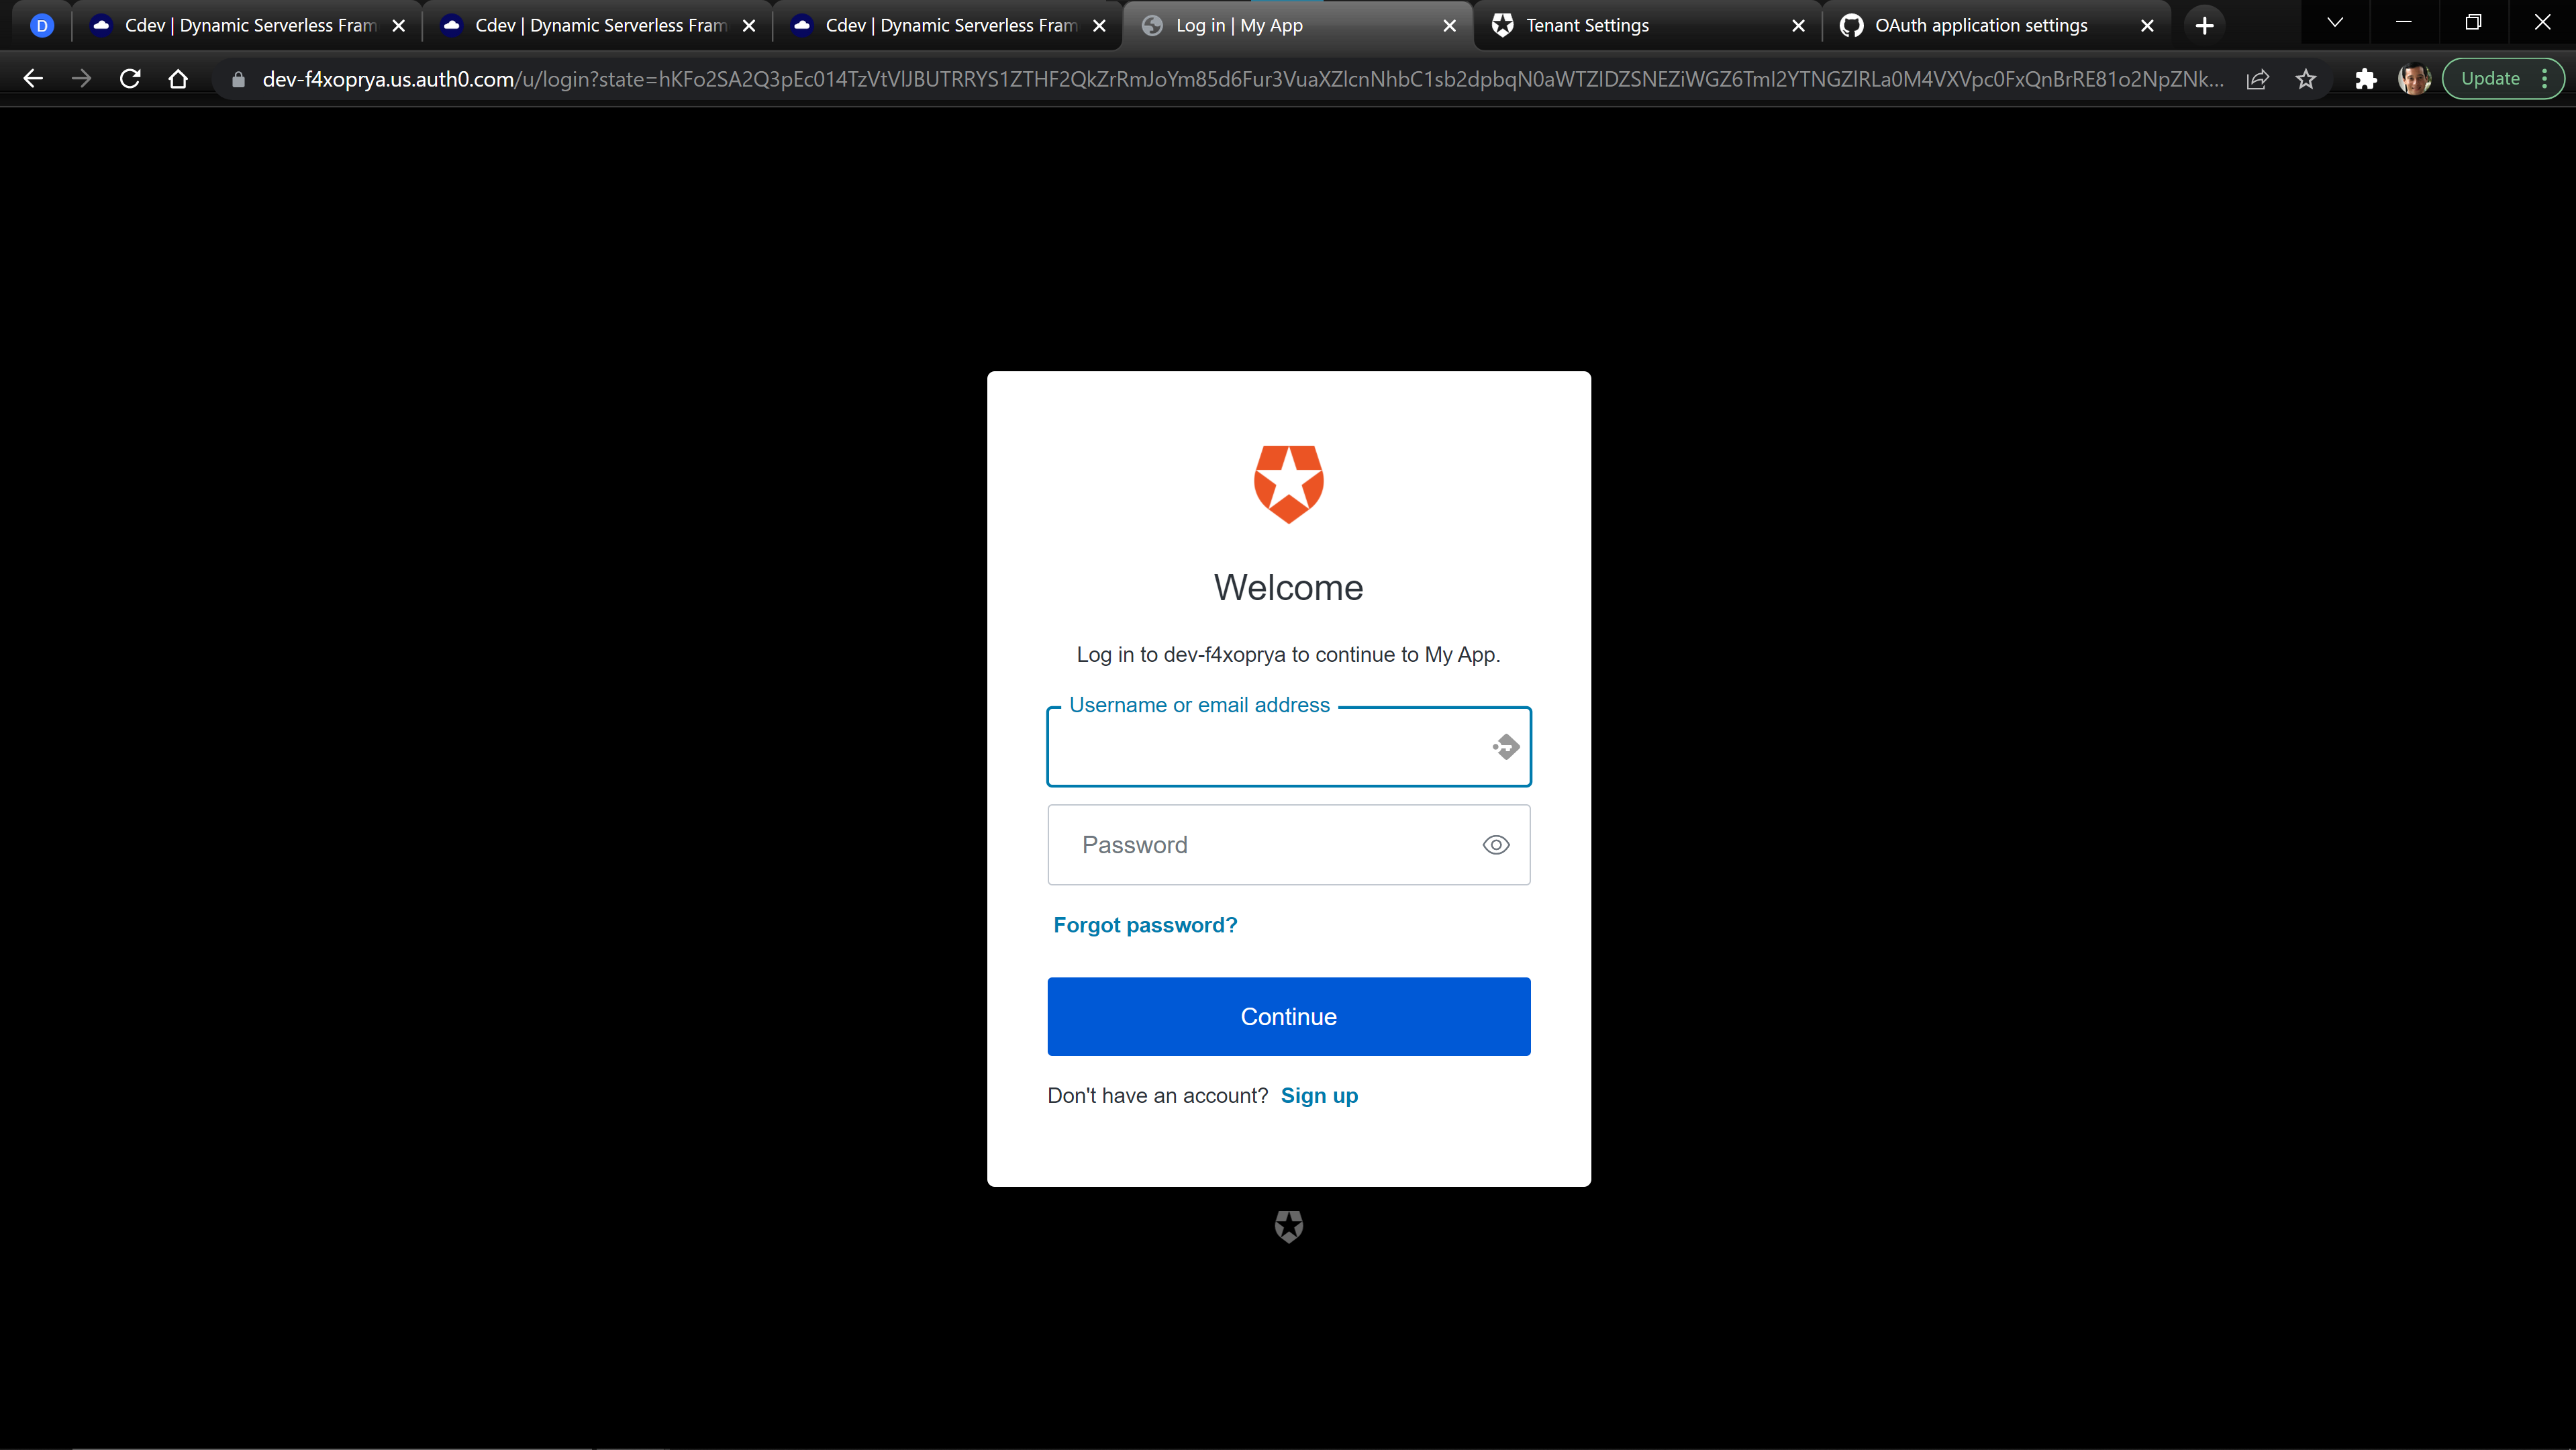
When you click login, you should be redirected to the Auth0 Universal Login Page.
After logging in, you will be redirected and should see the provided JWT and user information from Auth0. You can then use the Hit Api button to make a call to your API.